Array ( [0] => 280 [ID] => 280 [1] => 1 [TYPEID] => 1 [2] => 0 [SECTIONID] => 0 [3] => project-details [MOD_NAME] => project-details [4] => [TITLE] => [5] => Project Details [META_TITLE] => New Years Greeting Card with Amplify Texture [6] => [META_DESCRIPTION] => New Years Greeting Card with Amplify Texture [7] => [META_KEYWORDS] => [8] => [BUTTON_TITLE] => [9] => [BODY] => [10] => [BODY_SIDE] => [11] => [MODULE_PROCESSING] => [12] => [MODULE_META] => [13] => project-details-head.php [MODULE_HEAD] => project-details-head.php [14] => project-details-body.php [MODULE_BODY] => project-details-body.php [15] => [MODULE_SIDE] => [16] => 0 [TOP_ORDER] => 0 [17] => 0 [HITS_UNIQUE] => 0 [18] => 0 [HITS_REPEAT] => 0 [19] => 0 [ROBOT_HITS] => 0 [20] => 0000-00-00 00:00:00 [LASTVIEWED] => 0000-00-00 00:00:00 [21] => 0000-00-00 00:00:00 [ROBOT_LASTVIEWED] => 0000-00-00 00:00:00 [22] => 0.70 [PRIORITY] => 0.70 [23] => 1 [SITEMAP] => 1 [24] => 1 [ACTIVE] => 1 [25] => 1 [DISPLAY_TITLE] => 1 [26] => 0 [SSL_MODE] => 0 [27] => 0 [EDITABLE] => 0 [28] => 0 [DELETABLE] => 0 [29] => 2013-11-05 00:00:00 [LASTUPDATED] => 2013-11-05 00:00:00 [30] => 2013-11-05 00:00:00 [CREATED] => 2013-11-05 00:00:00 )
Imagine Crafts
LearnMakeCommunityShop

New Years Greeting Card with Amplify Texture

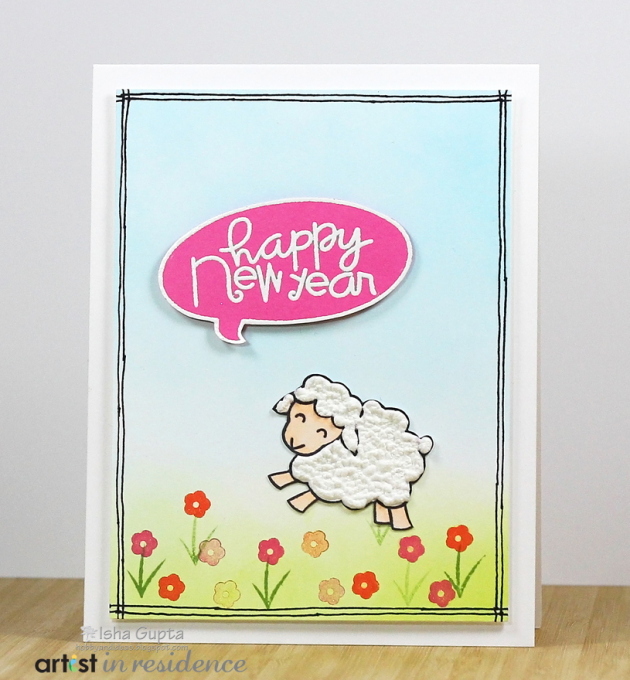
The texture from the new Amplify is so fluffy! It reminds me of a sheep's wool, so here's a fun and card that I created in celebration of Chinese New Year, the Year of the Sheep.


New Years Greeting Card with Amplify Texture

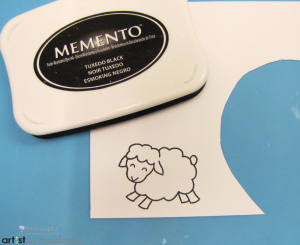
1. Stamp the image onto a scrap piece of paper.

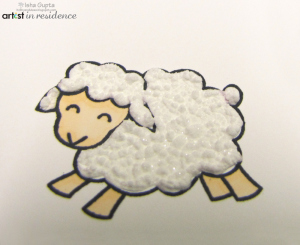
2. Color face and legs.

3. Apply Amplify in circular motion, sprinkle a bit of glitter. Apply heat using heat gun till it puffs up. Fussy cut the image.

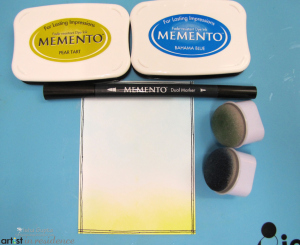
4. Cut a white mat layer measuring 3.75 by 5 inches. Using Jumbo Daubers, build color to create sky and grass with Memento Bahama Blue and Pear Tart.

5. Free hand draw/doodle a border with the fine tip of the Tuxedo Black Memento Marker.

6. Stamp flowers and grass using first and second generation stamping*.

7. Stamp and emboss the speech bubble and the sentiment (inside it the bubble) with VersaMark ink.

8. Use white embossing powder to heat set the stamped images.

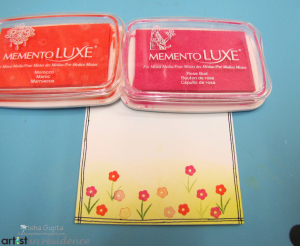
9. After the embossing powder has cooled, use a Jumbo Dauber to color the background with Memento Luxe Rose Bud.

10. With a damp paper towel (or wet wipe), remove excess Rose Bud color from white embossed areas.

11. Fussy cut the stamped image.

9. Fold a 4.25 by 5.5 inch cardbase.

10. Assemble everything together.


*1st and 2nd Generation Stamping: 1st generation stamping is the image that is created after you have inked your stamp once. 2nd generation would be stamping an image once (the 1st generation) and then stamping a 2nd time without re-inking the stamp. 2nd Gen stamping creates wonderful backgrounds that can be stamped over with 1st Gen images to create depth in a background.


by Isha Gupta

Difficulty

Intermediate

Time

½ an hour

Materials Needed

IMAGINE Crafts featuring Tsukineko:

Other Supplies:

  • Neenah: Solar White cardstock
  • Lawn Fawn: Hello Baby and Critters on the Farm stamps
  • Paper Smooches: "He Said, She Said" and Christmas Sampler stamp sets
  • Miscellaneous: clear glitter; Tombow mono-multi glue, heat tool, 3D foam pad, Copic Marker E00


Sign up for our newsletter
Facebook Pinterest Twitter YouTube Vimeo