Array ( [0] => 280 [ID] => 280 [1] => 1 [TYPEID] => 1 [2] => 0 [SECTIONID] => 0 [3] => project-details [MOD_NAME] => project-details [4] => [TITLE] => [5] => Project Details [META_TITLE] => VersaFine Vintage Sepia to Make a Postcard from the Past [6] => [META_DESCRIPTION] => VersaFine Vintage Sepia to Make a Postcard from the Past [7] => [META_KEYWORDS] => [8] => [BUTTON_TITLE] => [9] => [BODY] => [10] => [BODY_SIDE] => [11] => [MODULE_PROCESSING] => [12] => [MODULE_META] => [13] => project-details-head.php [MODULE_HEAD] => project-details-head.php [14] => project-details-body.php [MODULE_BODY] => project-details-body.php [15] => [MODULE_SIDE] => [16] => 0 [TOP_ORDER] => 0 [17] => 0 [HITS_UNIQUE] => 0 [18] => 0 [HITS_REPEAT] => 0 [19] => 0 [ROBOT_HITS] => 0 [20] => 0000-00-00 00:00:00 [LASTVIEWED] => 0000-00-00 00:00:00 [21] => 0000-00-00 00:00:00 [ROBOT_LASTVIEWED] => 0000-00-00 00:00:00 [22] => 0.70 [PRIORITY] => 0.70 [23] => 1 [SITEMAP] => 1 [24] => 1 [ACTIVE] => 1 [25] => 1 [DISPLAY_TITLE] => 1 [26] => 0 [SSL_MODE] => 0 [27] => 0 [EDITABLE] => 0 [28] => 0 [DELETABLE] => 0 [29] => 2013-11-05 00:00:00 [LASTUPDATED] => 2013-11-05 00:00:00 [30] => 2013-11-05 00:00:00 [CREATED] => 2013-11-05 00:00:00 )
Imagine Crafts
LearnMakeCommunityShop

VersaFine Vintage Sepia to Make a Postcard from the Past

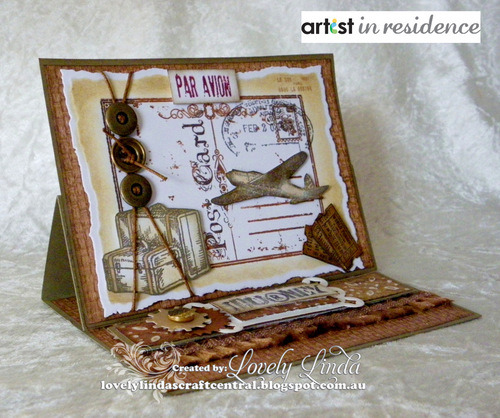
This vintage postcard inspired greeting is perfect for many different occassions.


VersaFine Vintage Sepia to Make a Postcard from the Past
  1. Apply StazOn Spiced Chai over the entire postcard stamp.
  2. Ink around the edges and any other areas you'd like to highlight with StazOn Ganache.
  3. Stamp onto white cardstock.
  4. Cut/emboss stamped image using A2 Distressed Edges die.
  5. Using the die as a stencil, sponge around the inside of the die with Delicata Golden Glitz before removing the die.
  6. Stamp the suitcase using Memento Espresso Truffle.
  7. Fussy cut the stamped suitcase image.
  8. Stamp sentiment using StazOn Claret and cut to size.
  9. Stamp postage image on postcard using Espresso Truffle.
  10. Stamp the air plane image using Espresso Truffle.
  11. Color the air plane using a Sponge Dauber with Golden Glitz.
  12. Fussy cut the air plane image.
  13. Adhere the air place to the postcard image using 3D Foam Squares.
  14. Thread twine through buttons and adhere to the card using liquid glue as shown in the photo above.
  15. Stamp tickets onto kraft cardstock with VersaFine Onyx Black.
  16. Sponge around the edges using both VersaFine Vintage Sepia and Memento Espresso Truffle.
  17. Cut/emboss one (1) tag from Diamond Effect die from white cardstock.
  18. Stamp sentiment and adhere to tag.
  19. Cut two (2) different size Sprightly Sprockets and adhere to left side of tag.
  20. Adhere button using liquid glue.
  21. Adhere all prepared portions of the card to the prepared easel card as shown in the main photo.
  22. Finish by adding a row of fringing to the raised portion of the base.
by Linda Lucas

Difficulty

Intermediate

Time

45 minutes

Materials Needed

Imagine Crafts/Tsukineko:

Other supplies:

  • Spellbinders: A2 Distressed Edges, Diamond Effects Nestabilities® Card Creator; Sprightly Sprockets Shapeabilities
  • Stampendous: Air Travel Clear Stamps
  • May Arts: ribbon, twine
  • Scrapbook Adhesives by 3L: 3D Foam Squares, E-Z Adhesive Runner
  • Cardstock: white, brown, kraft
  • Miscellaneous: liquid glue, sentiment and ticket stamps, buttons, fringed ribbon


Sign up for our newsletter
Facebook Pinterest Twitter YouTube Vimeo