Array ( [0] => 280 [ID] => 280 [1] => 1 [TYPEID] => 1 [2] => 0 [SECTIONID] => 0 [3] => project-details [MOD_NAME] => project-details [4] => [TITLE] => [5] => Project Details [META_TITLE] => Memento Luxe for a Weathered Postcard [6] => [META_DESCRIPTION] => Memento Luxe for a Weathered Postcard [7] => [META_KEYWORDS] => [8] => [BUTTON_TITLE] => [9] => [BODY] => [10] => [BODY_SIDE] => [11] => [MODULE_PROCESSING] => [12] => [MODULE_META] => [13] => project-details-head.php [MODULE_HEAD] => project-details-head.php [14] => project-details-body.php [MODULE_BODY] => project-details-body.php [15] => [MODULE_SIDE] => [16] => 0 [TOP_ORDER] => 0 [17] => 0 [HITS_UNIQUE] => 0 [18] => 0 [HITS_REPEAT] => 0 [19] => 0 [ROBOT_HITS] => 0 [20] => 0000-00-00 00:00:00 [LASTVIEWED] => 0000-00-00 00:00:00 [21] => 0000-00-00 00:00:00 [ROBOT_LASTVIEWED] => 0000-00-00 00:00:00 [22] => 0.70 [PRIORITY] => 0.70 [23] => 1 [SITEMAP] => 1 [24] => 1 [ACTIVE] => 1 [25] => 1 [DISPLAY_TITLE] => 1 [26] => 0 [SSL_MODE] => 0 [27] => 0 [EDITABLE] => 0 [28] => 0 [DELETABLE] => 0 [29] => 2013-11-05 00:00:00 [LASTUPDATED] => 2013-11-05 00:00:00 [30] => 2013-11-05 00:00:00 [CREATED] => 2013-11-05 00:00:00 )
Imagine Crafts
LearnMakeCommunityShop

Memento Luxe for a Weathered Postcard

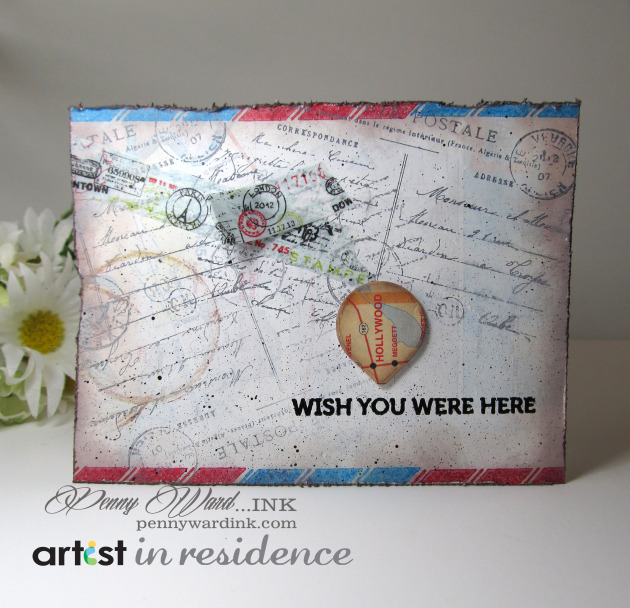
Create your own antiqued travel themed card.


Memento Luxe for a Weathered Postcard
  1. Adhere section of map to white card stock. Trim to 5.5 x 4.25 inches. Smear Gesso over top of map (just so you can barely see the map underneath) and let dry.
  2. Stamp slanted rectangles with Memento Luxe Bahama Blue and Love Letter across the top and bottom of card front.
  3. Stamp postmark with Memeto Luxe Gray Flannel. (I stamped three times without reinking)
  4. Ink bottom of cup with Memento Luxe Peanut Brittle and Rich Cocoa, then stamp off once onto the Craft Mat before stamping onto the card front.
  5. Ink edges of card front with Memento Desert Sand and Rich Cocoa.
  6. Stamp and heat emboss greeting with black embossing powder.
  7. Add printed washi tape.
  8. Using a toothbrush, flick Tuxedo Black Pico Embellisher across card front.
  9. Die cut a scrap of the map with the Geo tag die, edge with Desert Sand and Rich Cocoa, and adhere to card front with foam adhesive.
  10. Distress edges of card front and ink edges with Memento Luxe Rich Cocoa.
by Penny Ward

Difficulty

Intermediate

Time

½ hour

Materials Needed

IMAGINE Crafts/Tsukineko:

Other supplies:

  • Reverse Confetti:  Tinsel n' Trim stamp set
  • Stampendous:  Carte Postale stamp
  • Simon Says Stamp:  Road Trip stamp and die set
  • Queen & Co. : Travel Postmark washi tape
  • Craftwell:  Ebosser
  • Miscellaneous:  old map, gesso, coffee cup, toothbrush, distress tool, foam adhesive


Sign up for our newsletter
Facebook Pinterest Twitter YouTube Vimeo