Array ( [0] => 280 [ID] => 280 [1] => 1 [TYPEID] => 1 [2] => 0 [SECTIONID] => 0 [3] => project-details [MOD_NAME] => project-details [4] => [TITLE] => [5] => Project Details [META_TITLE] => Radiant Neon Ink for Star Thanks Card [6] => [META_DESCRIPTION] => Combining Stars and Stripes is always fun. I haven'tt used my awesome Radiant Neon inks for a little while now, so that inspired me to create a rainbow of stars:) [7] => [META_KEYWORDS] => [8] => [BUTTON_TITLE] => [9] => [BODY] => [10] => [BODY_SIDE] => [11] => [MODULE_PROCESSING] => [12] => [MODULE_META] => [13] => project-details-head.php [MODULE_HEAD] => project-details-head.php [14] => project-details-body.php [MODULE_BODY] => project-details-body.php [15] => [MODULE_SIDE] => [16] => 0 [TOP_ORDER] => 0 [17] => 0 [HITS_UNIQUE] => 0 [18] => 0 [HITS_REPEAT] => 0 [19] => 0 [ROBOT_HITS] => 0 [20] => 0000-00-00 00:00:00 [LASTVIEWED] => 0000-00-00 00:00:00 [21] => 0000-00-00 00:00:00 [ROBOT_LASTVIEWED] => 0000-00-00 00:00:00 [22] => 0.70 [PRIORITY] => 0.70 [23] => 1 [SITEMAP] => 1 [24] => 1 [ACTIVE] => 1 [25] => 1 [DISPLAY_TITLE] => 1 [26] => 0 [SSL_MODE] => 0 [27] => 0 [EDITABLE] => 0 [28] => 0 [DELETABLE] => 0 [29] => 2013-11-05 00:00:00 [LASTUPDATED] => 2013-11-05 00:00:00 [30] => 2013-11-05 00:00:00 [CREATED] => 2013-11-05 00:00:00 )
Imagine Crafts
LearnMakeCommunityShop

Radiant Neon Ink for Star Thanks Card

Combining Stars and Stripes is always fun. I haven'tt used my awesome Radiant Neon inks for a little while now, so that inspired me to create a rainbow of stars:)


Radiant Neon Ink for Star Thanks Card

Directions:

1. Cut/score card base to a finished size of 4¼˝ x 5½˝ from white cardstock.

AIR_2015_IG_Star_Stripe_step1

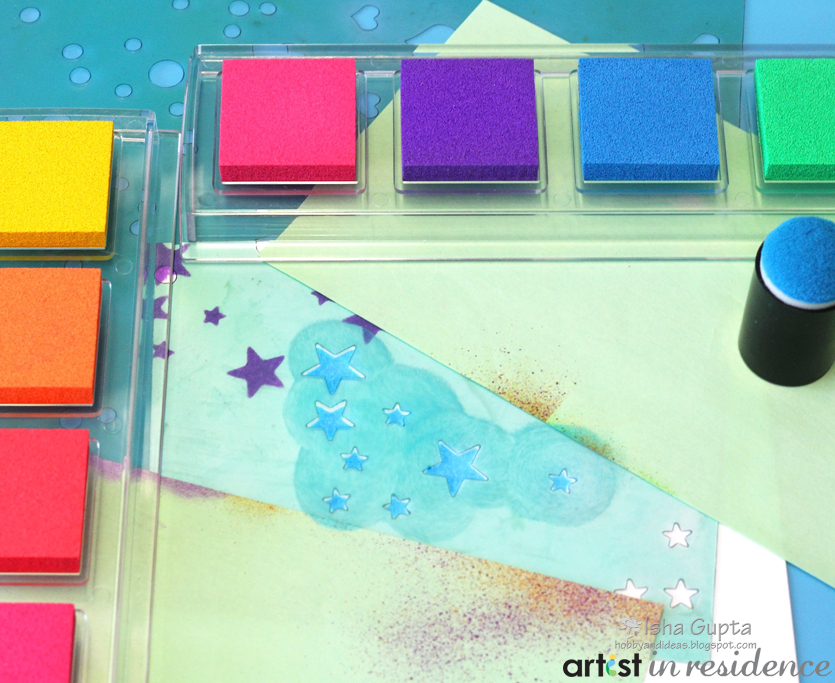
2. Take a piece of white cardstock. Use the stencil and mask the areas to sponge ink to selective stars.

AIR_2015_IG_Star_Stripe_step2

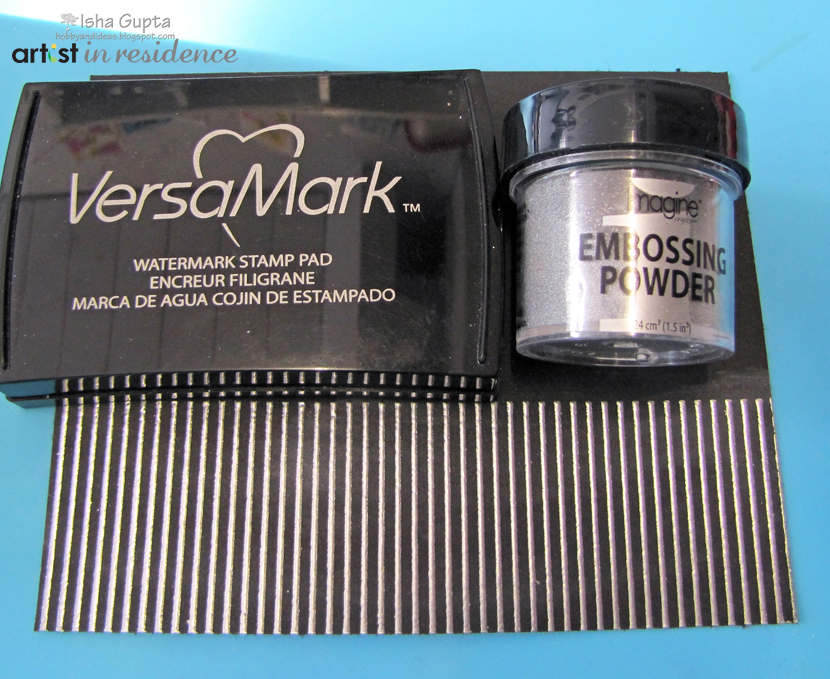
3. Take a piece of black cardstock. Use VersaFine and silver embossing powder to stamp and emboss the stripes. Cut about an inch stripe from this panel.

AIR_2015_IG_Star_Stripe_step3

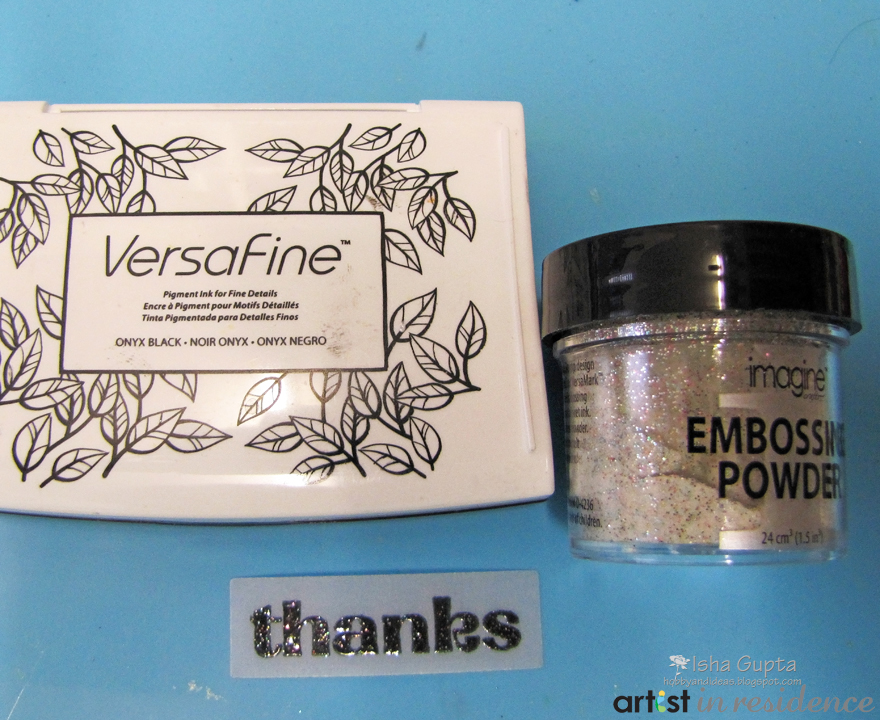
4. Die-cut a frame using vellum, stamp the sentiment and emboss it using Sparkle embossing powder.

AIR_2015_IG_Star_Stripe_step4

5. Die-cut the frame 3 times using white cardstock and once using the sponged panel. Stack them together keeping the sponged part on top. Adhere it to the card panel. Adhere the sentiment piece in the center of the frame.

6. Assemble everything together as per the main card.

by Isha Gupta

Difficulty

Beginner - Intermediate

Time

1/2 hour + dry time

Materials Needed

ImagineCrafts featuring Tsukineko:

Other:

  • Stamp: Fancy Frames (Paper Smooches); Pinstripe Background (My Favorite Things)
  • Die: Fancy Frame Icons (Paper Smooches)
  • Cardstock:  Solar white, Black (Neenah)
  • Miscellaneous: Stencil: Confetti (Heidi Swapp); Tombow mono multi glue


Sign up for our newsletter
Facebook Pinterest Twitter YouTube Vimeo