Array ( [0] => 280 [ID] => 280 [1] => 1 [TYPEID] => 1 [2] => 0 [SECTIONID] => 0 [3] => project-details [MOD_NAME] => project-details [4] => [TITLE] => [5] => Project Details [META_TITLE] => Always and Forever Valentine's Card [6] => [META_DESCRIPTION] => Always and Forever Valentine's Card [7] => [META_KEYWORDS] => [8] => [BUTTON_TITLE] => [9] => [BODY] => [10] => [BODY_SIDE] => [11] => [MODULE_PROCESSING] => [12] => [MODULE_META] => [13] => project-details-head.php [MODULE_HEAD] => project-details-head.php [14] => project-details-body.php [MODULE_BODY] => project-details-body.php [15] => [MODULE_SIDE] => [16] => 0 [TOP_ORDER] => 0 [17] => 0 [HITS_UNIQUE] => 0 [18] => 0 [HITS_REPEAT] => 0 [19] => 0 [ROBOT_HITS] => 0 [20] => 0000-00-00 00:00:00 [LASTVIEWED] => 0000-00-00 00:00:00 [21] => 0000-00-00 00:00:00 [ROBOT_LASTVIEWED] => 0000-00-00 00:00:00 [22] => 0.70 [PRIORITY] => 0.70 [23] => 1 [SITEMAP] => 1 [24] => 1 [ACTIVE] => 1 [25] => 1 [DISPLAY_TITLE] => 1 [26] => 0 [SSL_MODE] => 0 [27] => 0 [EDITABLE] => 0 [28] => 0 [DELETABLE] => 0 [29] => 2013-11-05 00:00:00 [LASTUPDATED] => 2013-11-05 00:00:00 [30] => 2013-11-05 00:00:00 [CREATED] => 2013-11-05 00:00:00 )
Imagine Crafts
LearnMakeCommunityShop

Always and Forever Valentine's Card

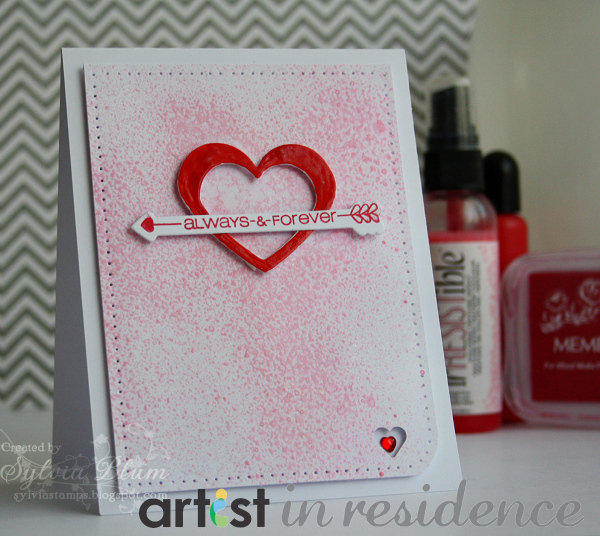
Valentine's Day always makes me think of red and pink – and those are the colors I chose to create this Clean and Simple greeting card, accented with a little bling heart in the bottom corner to carry the heart theme throughout this card.


Always and Forever Valentine's Card

1. Make 4 1/4" x 5 1/2" card base from white cardstock.

2. Cut another panel from white cardstock approx. 1/2" smaller than card front.

3. Die cut hearts from white cardstock and cover second smallest heart with StazOn Studio Glaze in St.Valentine. Let dry.

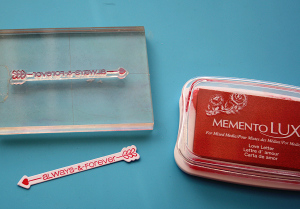
4. Die cut arrow from white cardstock and stamp sentiment arrow with Memento Luxe in Love Letter.

5. Round lower right corner of white focal panel and punch small heart in the same corner.

6. Spray irRESISTible in Pink Angel all over the white cardstock panel.

7. Spray small amount of Sheer Shimmer Spritz in Sparkle all over the panel. Let dry.

8. Create stitched frame around the focal panel by using a ruler and paper piercing tool.

9. Mount everything to the card front using foam tape.

10. Embellish with small heart-shaped rhinestone in the lower right edge.

by Sylvia Blum

Difficulty

Beginner

Time

About ½ an hour

Materials Needed

Imagine Crafts/Tsukineko:

Other Supplies:

  • CAS-ual Fridays Stamps: Cupids Arrows stamp set, Heart Board Fri-Dies.
  • Miscellaneous: white cardstock; corner rounder; heart punch; red heart-shaped rhinestone; paper piercing tool; ruler; dimensional foam tape


Sign up for our newsletter
Facebook Pinterest Twitter YouTube Vimeo