Array ( [0] => 280 [ID] => 280 [1] => 1 [TYPEID] => 1 [2] => 0 [SECTIONID] => 0 [3] => project-details [MOD_NAME] => project-details [4] => [TITLE] => [5] => Project Details [META_TITLE] => Happy Birthday Card with Neon and Vertigo Plastic [6] => [META_DESCRIPTION] => Happy Birthday Card with Neon and Vertigo Plastic [7] => [META_KEYWORDS] => [8] => [BUTTON_TITLE] => [9] => [BODY] => [10] => [BODY_SIDE] => [11] => [MODULE_PROCESSING] => [12] => [MODULE_META] => [13] => project-details-head.php [MODULE_HEAD] => project-details-head.php [14] => project-details-body.php [MODULE_BODY] => project-details-body.php [15] => [MODULE_SIDE] => [16] => 0 [TOP_ORDER] => 0 [17] => 0 [HITS_UNIQUE] => 0 [18] => 0 [HITS_REPEAT] => 0 [19] => 0 [ROBOT_HITS] => 0 [20] => 0000-00-00 00:00:00 [LASTVIEWED] => 0000-00-00 00:00:00 [21] => 0000-00-00 00:00:00 [ROBOT_LASTVIEWED] => 0000-00-00 00:00:00 [22] => 0.70 [PRIORITY] => 0.70 [23] => 1 [SITEMAP] => 1 [24] => 1 [ACTIVE] => 1 [25] => 1 [DISPLAY_TITLE] => 1 [26] => 0 [SSL_MODE] => 0 [27] => 0 [EDITABLE] => 0 [28] => 0 [DELETABLE] => 0 [29] => 2013-11-05 00:00:00 [LASTUPDATED] => 2013-11-05 00:00:00 [30] => 2013-11-05 00:00:00 [CREATED] => 2013-11-05 00:00:00 )
Imagine Crafts
LearnMakeCommunityShop

Happy Birthday Card with Neon and Vertigo Plastic

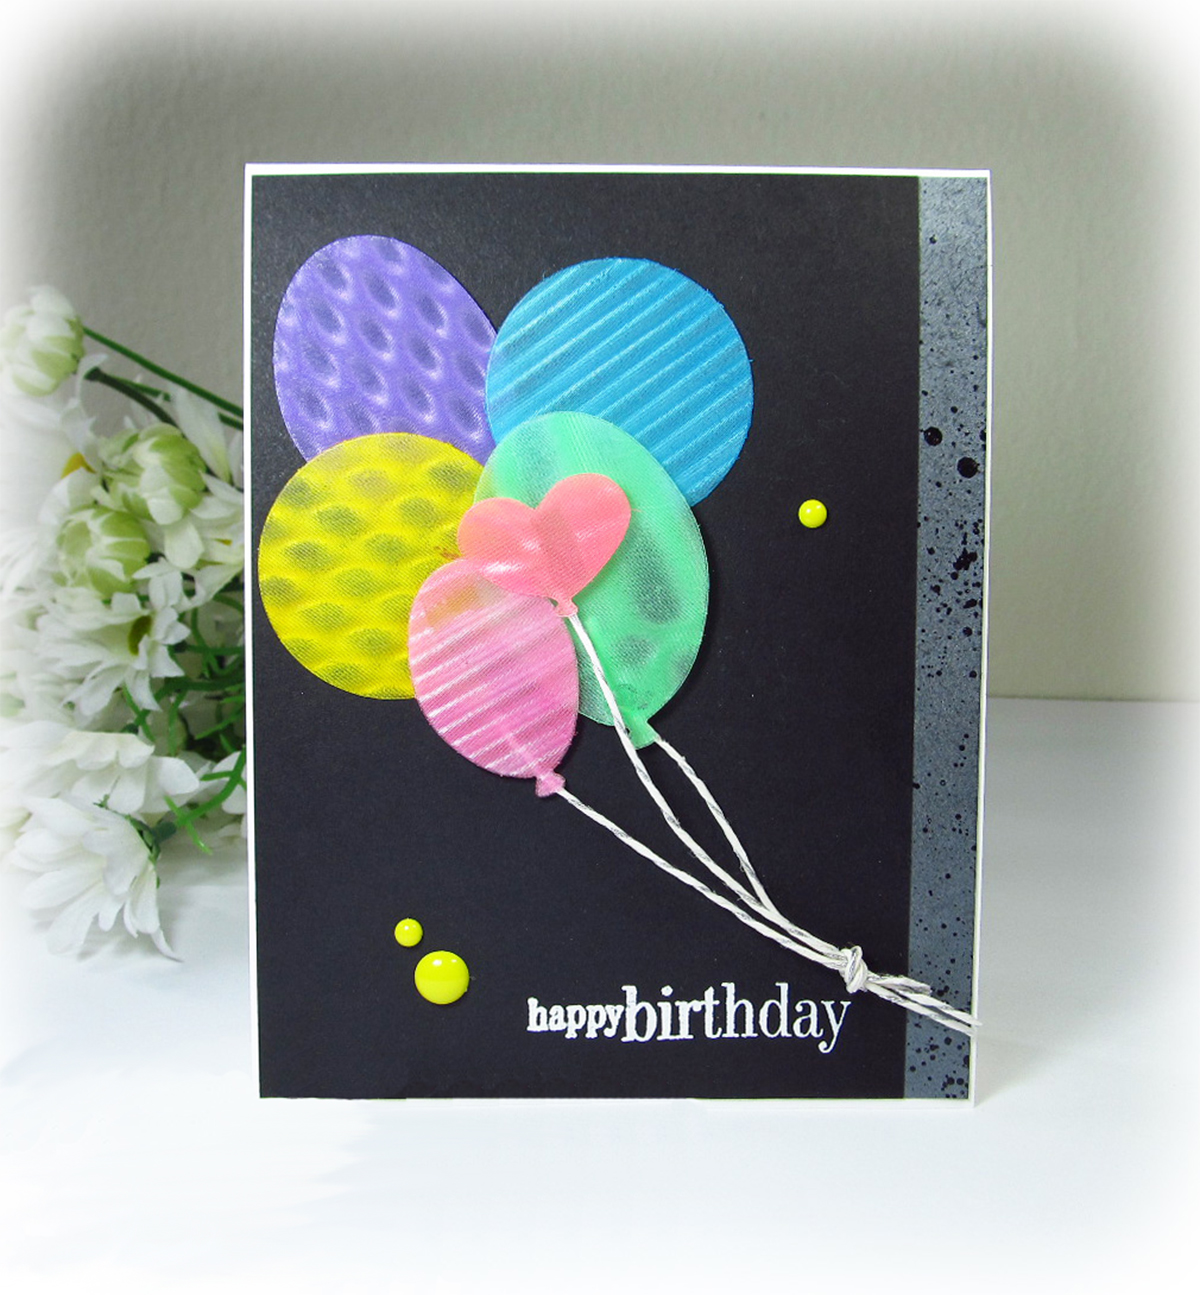
Learn how to create this easy card with Radiant Neon inks on Vertigo.


Happy Birthday Card with Neon and Vertigo Plastic
  1. Make card base from white card stock measuring 5.5 x 4.25 inches.
     
  2. Die cut balloons from sheets of Vertigo, ink with Radiant Neons, set aside to dry.
     
  3. Spritz black card stock with Shimmer Goosebumps. Ink over the GooseBumps with Moonlight White and then wipe with a dry paper towel for a resist effect. Adhere this panel to a piece of black cardstock so the whole panel is just a bit smaller than white card base.
     
  4. Stamp the sentiment with VersaMark and heat emboss with white embossing powder.
     
  5. Adhere balloons as shown. Adhere the top balloon with clear foam adhesive for dimension.
     
  6. Tie strands of cord into knot. Adhere "strings" beneath balloons.  Adhere knot to one side of card front.
     
  7. Add enamel dots as desired.
by Penny Ward

Difficulty

Beginner

Time

1 hour (with drying time)

Materials Needed

From Imagine Crafts/Tsukineko:

Miscellaneous:

  • Penny Black: Uplifting die, Friendship stamp set
  • Lawn Fawn:  white metallic cord
  • My Mind's Eye:  enamel dots
  • Craftwell:  ebosser
  • White & black card stock
  • adhesive, clear foam adhesive


Sign up for our newsletter
Facebook Pinterest Twitter YouTube Vimeo