make / by aesthetic / butterfly canvas tote bag craft project
Butterfly Canvas Tote Bag Craft Project
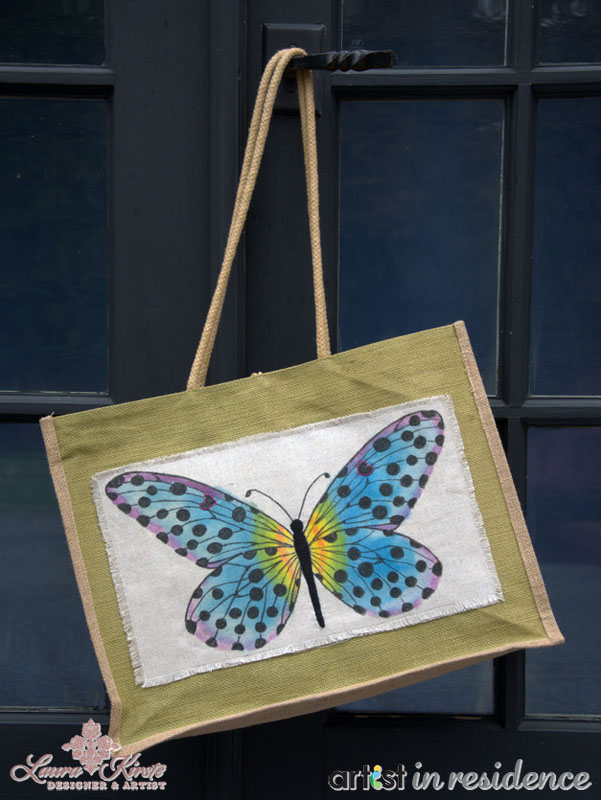
To create this butterfly pattern, enlarge a stamped image to use as a template. Add color with All-Purpose Inks.
-
Using VersaFine ink in Onyx Black, stamp polka-dotted butterfly onto white paper. Using copy machine (or copy/print shop), enlarge stamped butterfly image 400%. Half a butterfly should measure approximately 7”X7”, which will fit onto a standard sheet of paper.
-
Lay fabric over enlarged butterfly image. If fabric is thin, you’ll be able to see the image underneath, if not, try placing over a light box or tape to both to a window. Using Real Black Fabrico Marker brush tip draw onto fabric tracing ½ butterfly image. Flip butterfly image matching butterfly body and continue tracing entire image.
-
Lay butterfly fabric flat to paint. Have paper towels and cups of water available. It’s best to practice first to test colors and to see how the API reacts to your fabric. Do this by stamping butterfly image with VersaFine Onyx Black on fabric swatch and paint in with API. Dry with hair dryer. Optionally finish the dried fabric swatches by tracing and coloring polka dots and butterfly bodies with Fabrico markers.
IDEAS: Before painting on your fabric butterfly make a variety of butterfly color options by using Memento and/or Fabrico markers to color in stamped butterflies on paper. Then use all paper and fabric swatches on cards or other projects!
TIPS & TECHNIQUES:
Between each color application rinse brush in water and dry well on paper towel. Change rinse water between colors or have one rinse cup per color.
Clean edges – (less liquid on brush = less spreading of ink) first brush stroke in center of design then work near edges. Immediately use hair dryer to stop spreading.
Lighter color – (more water = lighter color) put a brush full of API on paper plate, add equal (or more) amount of water, dip brush in puddle and paint and/or paint with water over wet inked area brushing ink into dry area.
Watercolor Technique – use plenty of ink and water and allow spreading and drying naturally.
Blending colors – paint darker color first then immediately lighter color overlapping.
No color blending – paint one color, dry with hair dryer, then paint second color next to it.
-
Dip paint brush directly into Lemon Yellow API and paint center of butterfly as shown.
-
Dip paint brush directly into Tangerine API and paint butterfly as shown. (Left side shows blending technique, right side shows no blending).
-
Dip paint brush directly into Green Apple API and paint butterfly as shown.
-
Paint blue area in Watercolor Technique: 1. Dip paint brush directly into Sky Blue API and paint 1/3 of blue area. 2. Then create an API puddle on a paper plate with double amount of water and paint half of remaining blue area. 3. Lastly paint remainder with only blue paint rinse water.
-
Create Thistle API puddle on a paper plate with equal amount of water then paint along outer edges of butterfly as shown. Dry painted butterfly thoroughly with hair dryer. Iron painted butterfly to set color.
-
Using Real Black Fabrico marker brush tip, trace perimeter & antenna, and fill in body & polka dots on butterfly.
TECHNIQUE: For more accuracy filling in, draw around outer edge of polka dots and body then color in.
-
With black embroidery thread fill in butterfly body with satin stitch.
-
With magenta embroidery thread outline heart-shaped dot with backstitch. Iron if necessary.
-
If fabric is thin and you are using two pieces, pin them together as a sandwich (top=butterfly fabric face up, center =Wonder Under, bottom=plain fabric). NOTE: Trim along all edges of Wonder Under ½” smaller than fabric if you want to fray the edges, then center between both fabrics. Fuse together with iron according to Wonder Under instructions.
-
Using sewing machine, top stitch through all fused layers ½” from edge.
-
Pull threads on edge to fray all edges up to top stitching. Cut stray threads even with frayed edge.
-
Trim a piece of Wonder Under to fit inside the stitching lines. Pin to underside of butterfly fabric.
-
Place pinned butterfly fabric/Wonder Under onto center of fabric bag. Pin in place. Fuse together with iron according to Wonder Under instructions.