Array ( [0] => 280 [ID] => 280 [1] => 1 [TYPEID] => 1 [2] => 0 [SECTIONID] => 0 [3] => project-details [MOD_NAME] => project-details [4] => [TITLE] => [5] => Project Details [META_TITLE] => Hello Spring Bright Yellow Embossed Greeting Card [6] => [META_DESCRIPTION] => Hello Spring Bright Yellow Embossed Greeting Card [7] => [META_KEYWORDS] => [8] => [BUTTON_TITLE] => [9] => [BODY] => [10] => [BODY_SIDE] => [11] => [MODULE_PROCESSING] => [12] => [MODULE_META] => [13] => project-details-head.php [MODULE_HEAD] => project-details-head.php [14] => project-details-body.php [MODULE_BODY] => project-details-body.php [15] => [MODULE_SIDE] => [16] => 0 [TOP_ORDER] => 0 [17] => 0 [HITS_UNIQUE] => 0 [18] => 0 [HITS_REPEAT] => 0 [19] => 0 [ROBOT_HITS] => 0 [20] => 0000-00-00 00:00:00 [LASTVIEWED] => 0000-00-00 00:00:00 [21] => 0000-00-00 00:00:00 [ROBOT_LASTVIEWED] => 0000-00-00 00:00:00 [22] => 0.70 [PRIORITY] => 0.70 [23] => 1 [SITEMAP] => 1 [24] => 1 [ACTIVE] => 1 [25] => 1 [DISPLAY_TITLE] => 1 [26] => 0 [SSL_MODE] => 0 [27] => 0 [EDITABLE] => 0 [28] => 0 [DELETABLE] => 0 [29] => 2013-11-05 00:00:00 [LASTUPDATED] => 2013-11-05 00:00:00 [30] => 2013-11-05 00:00:00 [CREATED] => 2013-11-05 00:00:00 )
Imagine Crafts
LearnMakeCommunityShop

Hello Spring Bright Yellow Embossed Greeting Card

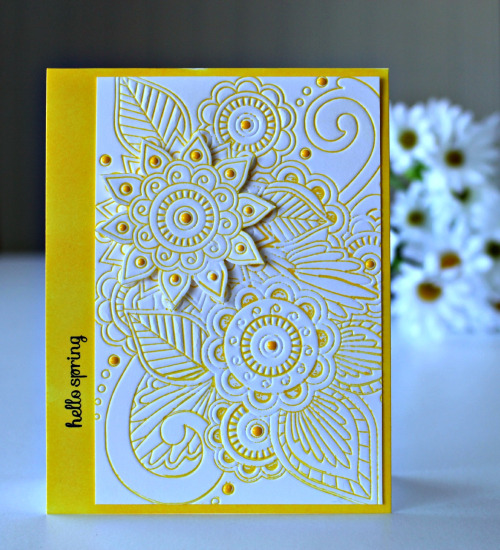
I love playing with Pico's and with Spring just around the corner, this is a fun embossing folder to play with. I've kept it fairly simply, but I can envision a really colorful zentangle with all the Pico colors.


Hello Spring Bright Yellow Embossed Greeting Card

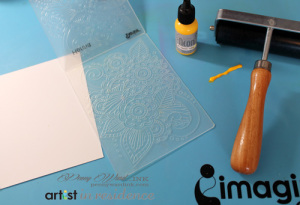
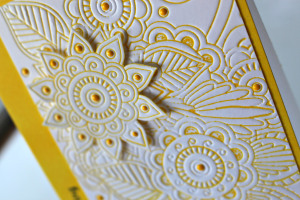
1.  Squirt a small amount of Radiant Neon Electric Yellow ink on the Craft Mat directly from the bottle. Using a brayer, apply to inside of embossing folder to give a letterpress look.

2. Cut white cardstock to 4. x 5.25 inches. Insert the cardstock piece into inked folder and run through your cutting/embossing machine. Repeat to make a total of two letterpressed panels.

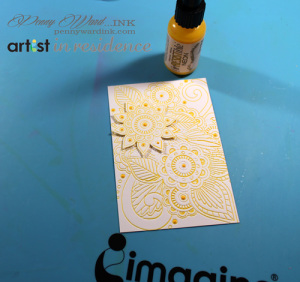
3. Add Electric Yellow Radiant Neon Pico Embellisher dots around the embossed cardstock as desired.

4. Trim largest flower from second panel and adhere to card front with foam adhesive.

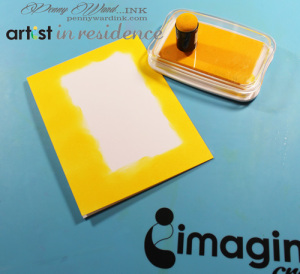
5. Cut white cardstock to 4.25 x 11 inches, then fold in half for a base card.

6. Ink edges of the card case with Radiant Neon Electric Yellow ink.

7.  Stamp greeting along the side with VersaFine Onyx Black.

8. Trim embossed panel and adhere to card base.
 

by Penny Ward

Difficulty

Intermediate

Time

About ½ an hour

Materials Needed

Imagine Crafts featuring Tsukineko:

Other Supplies:

  • Darice:  Henna embossing folder
  • Simon Says Stamp:  Happy stamp set
  • Craftwell:  eBosser
  • Miscellaneous: white cardstock, brayer, foam adhesive, glue of choice


Sign up for our newsletter
Facebook Pinterest Twitter YouTube Vimeo