Array ( [0] => 280 [ID] => 280 [1] => 1 [TYPEID] => 1 [2] => 0 [SECTIONID] => 0 [3] => project-details [MOD_NAME] => project-details [4] => [TITLE] => [5] => Project Details [META_TITLE] => Embossed Watercolor Roses with Memento Ink [6] => [META_DESCRIPTION] => Embossed Watercolor Roses with Memento Ink [7] => [META_KEYWORDS] => [8] => [BUTTON_TITLE] => [9] => [BODY] => [10] => [BODY_SIDE] => [11] => [MODULE_PROCESSING] => [12] => [MODULE_META] => [13] => project-details-head.php [MODULE_HEAD] => project-details-head.php [14] => project-details-body.php [MODULE_BODY] => project-details-body.php [15] => [MODULE_SIDE] => [16] => 0 [TOP_ORDER] => 0 [17] => 0 [HITS_UNIQUE] => 0 [18] => 0 [HITS_REPEAT] => 0 [19] => 0 [ROBOT_HITS] => 0 [20] => 0000-00-00 00:00:00 [LASTVIEWED] => 0000-00-00 00:00:00 [21] => 0000-00-00 00:00:00 [ROBOT_LASTVIEWED] => 0000-00-00 00:00:00 [22] => 0.70 [PRIORITY] => 0.70 [23] => 1 [SITEMAP] => 1 [24] => 1 [ACTIVE] => 1 [25] => 1 [DISPLAY_TITLE] => 1 [26] => 0 [SSL_MODE] => 0 [27] => 0 [EDITABLE] => 0 [28] => 0 [DELETABLE] => 0 [29] => 2013-11-05 00:00:00 [LASTUPDATED] => 2013-11-05 00:00:00 [30] => 2013-11-05 00:00:00 [CREATED] => 2013-11-05 00:00:00 )
Imagine Crafts
LearnMakeCommunityShop

Embossed Watercolor Roses with Memento Ink

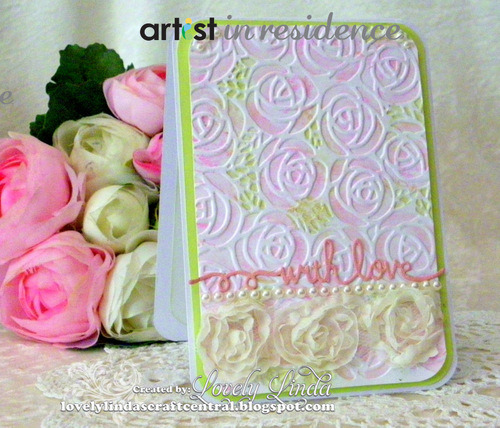
Inspiration is never too far away when you walk in the garden - we have beautiful roses in our garden and I love to look at them. It is not always possible to send fresh roses, but I can send a card that has been inspired by their beauty.


Embossed Watercolor Roses with Memento Ink


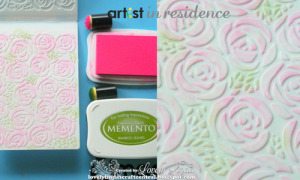
1. Sponge Radiant Neon Electric Pink onto raised roses on the Cabbage Roses Embossing Folder using Sponge Dauber.

2. Lightly sponge Memento Bamboo Leaves onto the leaves using a Sponge Dauber.

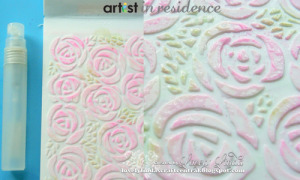
3. Spritz inked folder using water - it can be quite wet.

4. Place white cardstock into inked folder, close the folder and then pass through your die cut/embossing machine.

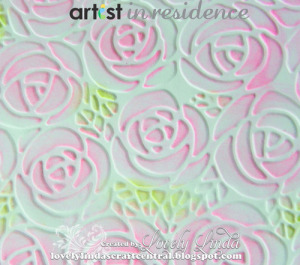
5. Remove embossed card and allow to dry. Once dry, cut to 4˝ x 5.5˝ and use a corner rounder to round all corners. Don't let that left over ink on the folder go to waste! Pass through another piece (or two!) of cardstock to create backgrounds for future projects.

6. Cut/score white cardstock to a finished size of 4.5˝ x 6˝ to use as a card base.

7. Round all corners of the cardbase.

8. Cut green cardstock to 5.75" x 4.25"; round corners of this layering piece then adhere to card base.

9. Top with the embossed rose piece using adhesive of choice.

10. Adhere the rose trim using liquid glue.

11. Attach self adhesive pearls above the rose trim, then add sentiment above the pearls.

12. Adhere three (3) pearls to each or the top corners, following the curved corners of the layering piece.

by Linda Lucas

Difficulty

Beginner

Time

½ hour

Materials Needed

Imagine Crafts/Tsukineko:

Other Supplies:

  • Spellbinders: M-Bossabilities Cabbage Rose, Shapeabilities Sentiments; Grand Calibur Die Cutting and Embossing Machine with Raspberry Plate
  • Want2Scrap: White Pearls Strip 72 Count 
  • Miscellaneous: corner rounder, roses trim, white and green cardstock, liquid glue, double-sided tape, dimensional foam tape, scissors


Sign up for our newsletter
Facebook Pinterest Twitter YouTube Vimeo