Array ( [0] => 280 [ID] => 280 [1] => 1 [TYPEID] => 1 [2] => 0 [SECTIONID] => 0 [3] => project-details [MOD_NAME] => project-details [4] => [TITLE] => [5] => Project Details [META_TITLE] => Neon Hearts for a 3D Hello Card [6] => [META_DESCRIPTION] => Neon Hearts for a 3D Hello Card [7] => [META_KEYWORDS] => [8] => [BUTTON_TITLE] => [9] => [BODY] => [10] => [BODY_SIDE] => [11] => [MODULE_PROCESSING] => [12] => [MODULE_META] => [13] => project-details-head.php [MODULE_HEAD] => project-details-head.php [14] => project-details-body.php [MODULE_BODY] => project-details-body.php [15] => [MODULE_SIDE] => [16] => 0 [TOP_ORDER] => 0 [17] => 0 [HITS_UNIQUE] => 0 [18] => 0 [HITS_REPEAT] => 0 [19] => 0 [ROBOT_HITS] => 0 [20] => 0000-00-00 00:00:00 [LASTVIEWED] => 0000-00-00 00:00:00 [21] => 0000-00-00 00:00:00 [ROBOT_LASTVIEWED] => 0000-00-00 00:00:00 [22] => 0.70 [PRIORITY] => 0.70 [23] => 1 [SITEMAP] => 1 [24] => 1 [ACTIVE] => 1 [25] => 1 [DISPLAY_TITLE] => 1 [26] => 0 [SSL_MODE] => 0 [27] => 0 [EDITABLE] => 0 [28] => 0 [DELETABLE] => 0 [29] => 2013-11-05 00:00:00 [LASTUPDATED] => 2013-11-05 00:00:00 [30] => 2013-11-05 00:00:00 [CREATED] => 2013-11-05 00:00:00 )
Imagine Crafts
LearnMakeCommunityShop

Neon Hearts for a 3D Hello Card

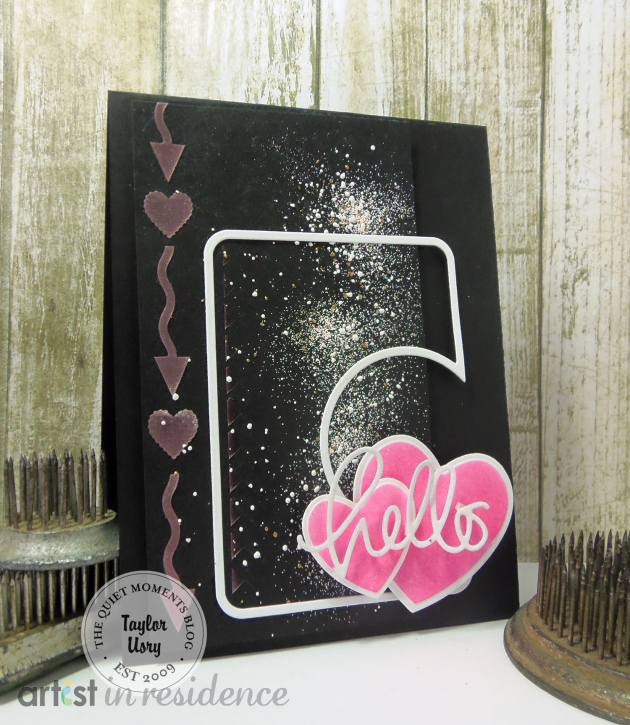
The Radiant Neon inks make me happy... I adore the pop of color they give, especially against a black background! When I sat down to make this card, my goal was to make something lovey-dovey but still have it usable for a guy or a girl, and for any occasion that a 'hello' was needed. You never know when you'll need to grab a virtual hug from your stash to send out!


Neon Hearts for a 3D Hello Card

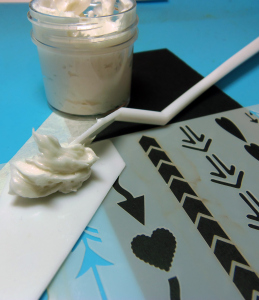
1. Place stencil in desired location on top of yardstick and there with low-tack tape.

2. Scoop Creative Medium in Pink out of tub with the Diamond Trowel.

3. Scrape it onto the Scotty Knife.

4. Spread a thin layer over the stencil, taking care to completely cover all areas. (Wash stencil and tools immediately after use, in warm water). Set aside to dry.

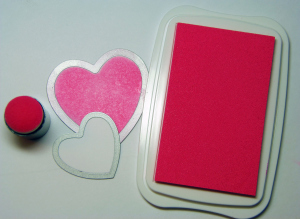
5. Die cut two hearts from white cardstock.

6. Before removing from die, use Sponge Dauber to add Radiant Neon Electric Pink ink.

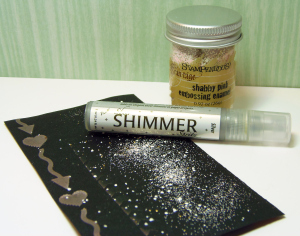
7. Spritz the panel with dry Creative Medium with Sheer Shimmer Spritz (Silver).

8. Sprinkle with embossing powder and heat set.

9. Add all pieces to card base as desired.

by Taylor Usry

Difficulty

Beginner

Time

about ½ an hour

Materials Needed

IMAGINE Crafts/Tsukineko:

Other Supplies:

  • Crafter’s Companion: Die'sire Essentials 'Hearts' dies
  • Simon Says Stamp: 'Hello' and 'Circle Card Border' die
  • The Crafter's Workshop: Mini Arrows & Hearts stencils
  • Stampendous: Shabby Pink embossing powder
  • Miscellaneous: black cardstock, foam adhesive


Sign up for our newsletter
Facebook Pinterest Twitter YouTube Vimeo