Array ( [0] => 280 [ID] => 280 [1] => 1 [TYPEID] => 1 [2] => 0 [SECTIONID] => 0 [3] => project-details [MOD_NAME] => project-details [4] => [TITLE] => [5] => Project Details [META_TITLE] => Divine Delicata for a Bird Theme Card [6] => [META_DESCRIPTION] => Divine Delicata for a Bird Theme Card [7] => [META_KEYWORDS] => [8] => [BUTTON_TITLE] => [9] => [BODY] => [10] => [BODY_SIDE] => [11] => [MODULE_PROCESSING] => [12] => [MODULE_META] => [13] => project-details-head.php [MODULE_HEAD] => project-details-head.php [14] => project-details-body.php [MODULE_BODY] => project-details-body.php [15] => [MODULE_SIDE] => [16] => 0 [TOP_ORDER] => 0 [17] => 0 [HITS_UNIQUE] => 0 [18] => 0 [HITS_REPEAT] => 0 [19] => 0 [ROBOT_HITS] => 0 [20] => 0000-00-00 00:00:00 [LASTVIEWED] => 0000-00-00 00:00:00 [21] => 0000-00-00 00:00:00 [ROBOT_LASTVIEWED] => 0000-00-00 00:00:00 [22] => 0.70 [PRIORITY] => 0.70 [23] => 1 [SITEMAP] => 1 [24] => 1 [ACTIVE] => 1 [25] => 1 [DISPLAY_TITLE] => 1 [26] => 0 [SSL_MODE] => 0 [27] => 0 [EDITABLE] => 0 [28] => 0 [DELETABLE] => 0 [29] => 2013-11-05 00:00:00 [LASTUPDATED] => 2013-11-05 00:00:00 [30] => 2013-11-05 00:00:00 [CREATED] => 2013-11-05 00:00:00 )
Imagine Crafts
LearnMakeCommunityShop

Divine Delicata for a Bird Theme Card

It is always exciting to play with new product – even more so when it is a new Delicata ink – I love the shimmer of these – the richness of Celestial Copper is divine – a picture speaks a thousand words – so I will let the tutorial speak for itself.


Divine Delicata for a Bird Theme Card

1. Cut card base to 4″ x 10.5″ using blue cardstock.

2. Score in the middle and fold to form card base.

3. Cut/emboss white card using A2 Valiant Honor #4 (#1 being the smallest).

4. Adhere to card base.

5. Cut Prima paper to fit inside the filigree border and adhere to card base.

6. Stamp image using Delicata Celestial Copper – apply with Sponge Dauber if preferred.

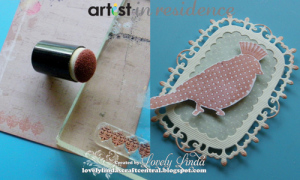
7. Stamp border onto Prima Paper using Delicata Celestial Copper.

8. Cut/emboss Fancy Label Tags Three using white cardstock.

9. Add patterned cardboard behind the Tag – recycling packaging works well.

10. Fussy cut/hand-cut image using scissors.

11. Pop image onto tag using 3D Foam Squares

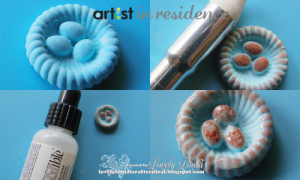
12. Using Delicata Celestial Copper and a Brushstix, lightly color the embellishment.

13. Allow to dry.

14. Apply irRESISTible Pico Embellisher Shimmer, allow to dry.

15. Attach Seam Binding and May Arts Lace using double sided tape.

16. Adhere double bow using liquid glue.

17. Adhere Mulberry Paper Rose using liquid glue.

18. Attach the embellishment to the center of the bow.

19. Adhere Baby Bling to the lace.

20. Adhere the Bling Border to top of the card along with Baby Bling.

by Linda Lucas

Difficulty

Intermediate

Time

less than an hour

Materials Needed

Imagine Crafts/Tsukineko:

Other Supplies:

  • Spellbinders: A2 Valiant Honor Nestabilities Card Creator, Fancy Label Tags Three Shapeabilities Die D-Lites, Grand Calibur machine
  • Prima Flower Marketing: printed paper, flowers
  • May Arts Ribbon: ribbon
  • Want2Scrap: Beautiful Bling Borders, Baby Bling Turquoise
  • Miscellaneous: blue cardstock, white cardstock, scissors, adhesive of choice, bird stamp, acrylic block


Sign up for our newsletter
Facebook Pinterest Twitter YouTube Vimeo