Layouts are so much fun - we get to create and to capture those special moments that take hold of our hearts. I am always excited to add texture and focal points to my layouts and have done so using some of the fabulous new Creative Medium.
1. Cut strip of patterned paper, layered onto black cardstock cut slightly larger.
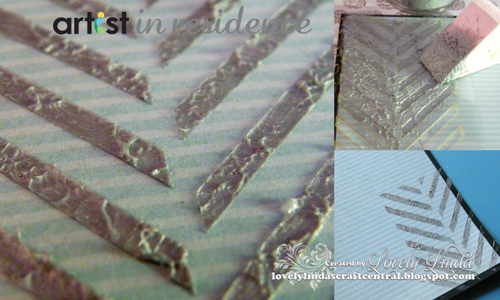
2. Place Chevron Stencil on top left hand corner.
3. Apply Creative Medium Metallic Silver to the stencil using an InkBlusher.
4. Repeat the process on lower right hand corner - allow to dry.
5. Lightly spritz paper using Danube Blue Fireworks!
6. Repeat using Tuxedo Black Fireworks!
7. Apply irRESISTible Pico Embellisher Wedding Dress by removing cap and dripping tube end over paper.

8. Paint top right corner with a light coat of white paint.
9. Place Chicken Wire Stencil on painted area.
10. Apply Creative Medium Metallic Silver randomly to the stencil using an InkBlusher.

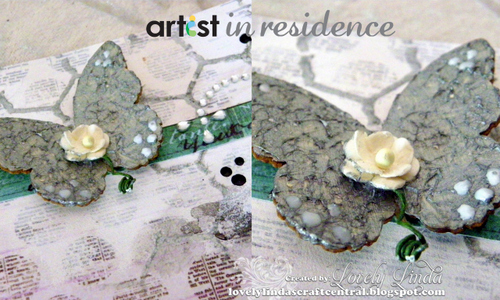
11. Apply Creative Medium Metallic Silver to the wooden butterfly using an InkBlusher, at the same time use the InkBlusher to add texture.
12. Remove the thin name strip of the paper, cut to size and add to layout.
13. Adhere the butterfly onto strip using liquid glue.
14. Add mulberry paper rose to the body of the butterfly.
15. Add bling strip to the right side of the butterfly.
16. Add drops of Pico Embellisher Tuxedo Black randomly onto the top right corner.
17. Add white spots on wings using Pico Embellisher Wedding Dress.

18. Add layers under the photo as shown above.
19. Adhere lace button using liquid glue.
20. Adhere the sentiment from Prima packaging using double sided tape.
21. Adhere Bling Border to the lower edge of sentiment.
22. Adhere flowers as shown in the main photo.
23. Cut sentiment into single words.
24. Adhere to the right side of the photo.
25. Add other portion of name strip to the bottom right corner of the layout.
26. Adhere bling border onto the strip.
IMAGINE Crafts/Tsukineko:
Other Supplies: