Array ( [0] => 280 [ID] => 280 [1] => 1 [TYPEID] => 1 [2] => 0 [SECTIONID] => 0 [3] => project-details [MOD_NAME] => project-details [4] => [TITLE] => [5] => Project Details [META_TITLE] => Upcycled Picture Frame to Jewelry Organizer with StazOn Ink [6] => [META_DESCRIPTION] => Upcycled Picture Frame to Jewelry Organizer with StazOn Ink [7] => [META_KEYWORDS] => [8] => [BUTTON_TITLE] => [9] => [BODY] => [10] => [BODY_SIDE] => [11] => [MODULE_PROCESSING] => [12] => [MODULE_META] => [13] => project-details-head.php [MODULE_HEAD] => project-details-head.php [14] => project-details-body.php [MODULE_BODY] => project-details-body.php [15] => [MODULE_SIDE] => [16] => 0 [TOP_ORDER] => 0 [17] => 0 [HITS_UNIQUE] => 0 [18] => 0 [HITS_REPEAT] => 0 [19] => 0 [ROBOT_HITS] => 0 [20] => 0000-00-00 00:00:00 [LASTVIEWED] => 0000-00-00 00:00:00 [21] => 0000-00-00 00:00:00 [ROBOT_LASTVIEWED] => 0000-00-00 00:00:00 [22] => 0.70 [PRIORITY] => 0.70 [23] => 1 [SITEMAP] => 1 [24] => 1 [ACTIVE] => 1 [25] => 1 [DISPLAY_TITLE] => 1 [26] => 0 [SSL_MODE] => 0 [27] => 0 [EDITABLE] => 0 [28] => 0 [DELETABLE] => 0 [29] => 2013-11-05 00:00:00 [LASTUPDATED] => 2013-11-05 00:00:00 [30] => 2013-11-05 00:00:00 [CREATED] => 2013-11-05 00:00:00 )
Imagine Crafts
LearnMakeCommunityShop

Upcycled Picture Frame to Jewelry Organizer with StazOn Ink

Create your own jewelry organizer from an old picture frame.


Upcycled Picture Frame to Jewelry Organizer with StazOn Ink
  1. Sponge StazOn Jet Black onto the frame with an InkBlusher.  It’s alright for the ink to be applied unevenly.
  2. Paint All Purpose Ink Black Pearl onto the frame to add sparkle and to antique the frame.  Allow to dry completely.
  3. Select images to use from the Paris and London Dog Tag sized Photo Elements and cut to size.
  4. Apply Creative Medium to the backside of each image and adhere to the frame.
  5. Once all of the Photo Elements have been adhered to the frame, apply at least two coats of Creative Medium (as a sealant) onto the entire frame and allow to dry completely.
  6. Cut chipboard and foam core to the size allowing them to fit inside of the back of the frame.
  7. Adhere these two pieces together.
  8. Wrap the chipboard/foam core with fabric of choice and adhere to the backside.
  9. Mount the fabric covered backing into the frame.
  10. Add knobs and any other decorative elements like ribbon to complete your new frame.
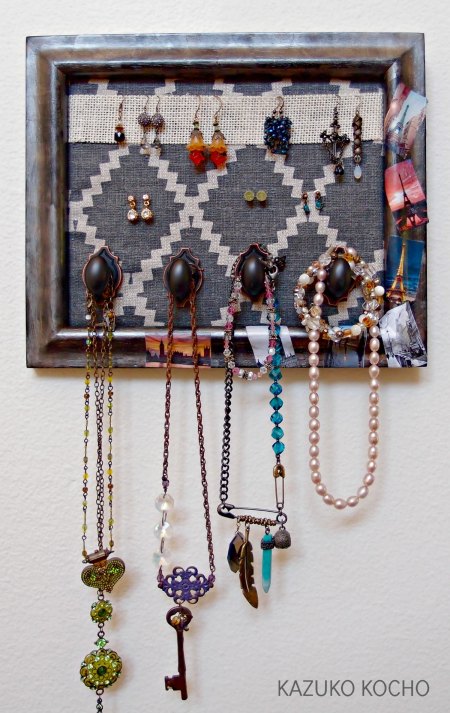
by Kazuko Kocho

Difficulty

Intermediate

Time

2 hours (with drying time)

Materials Needed

IMAGINE Crafts/Tsukineko:

Other supplies:

  • May Arts: ribbon
  • Miscellaneous: wood picture frame, paint brush, adhesive/tape, chip board, foam core, fabric, cabinet knobs


Sign up for our newsletter
Facebook Pinterest Twitter YouTube Vimeo