Array ( [0] => 280 [ID] => 280 [1] => 1 [TYPEID] => 1 [2] => 0 [SECTIONID] => 0 [3] => project-details [MOD_NAME] => project-details [4] => [TITLE] => [5] => Project Details [META_TITLE] => Brayer and Bokeh a Thank You Card [6] => [META_DESCRIPTION] => Brayer and Bokeh a Thank You Card [7] => [META_KEYWORDS] => [8] => [BUTTON_TITLE] => [9] => [BODY] => [10] => [BODY_SIDE] => [11] => [MODULE_PROCESSING] => [12] => [MODULE_META] => [13] => project-details-head.php [MODULE_HEAD] => project-details-head.php [14] => project-details-body.php [MODULE_BODY] => project-details-body.php [15] => [MODULE_SIDE] => [16] => 0 [TOP_ORDER] => 0 [17] => 0 [HITS_UNIQUE] => 0 [18] => 0 [HITS_REPEAT] => 0 [19] => 0 [ROBOT_HITS] => 0 [20] => 0000-00-00 00:00:00 [LASTVIEWED] => 0000-00-00 00:00:00 [21] => 0000-00-00 00:00:00 [ROBOT_LASTVIEWED] => 0000-00-00 00:00:00 [22] => 0.70 [PRIORITY] => 0.70 [23] => 1 [SITEMAP] => 1 [24] => 1 [ACTIVE] => 1 [25] => 1 [DISPLAY_TITLE] => 1 [26] => 0 [SSL_MODE] => 0 [27] => 0 [EDITABLE] => 0 [28] => 0 [DELETABLE] => 0 [29] => 2013-11-05 00:00:00 [LASTUPDATED] => 2013-11-05 00:00:00 [30] => 2013-11-05 00:00:00 [CREATED] => 2013-11-05 00:00:00 )
Imagine Crafts
LearnMakeCommunityShop

Brayer and Bokeh a Thank You Card

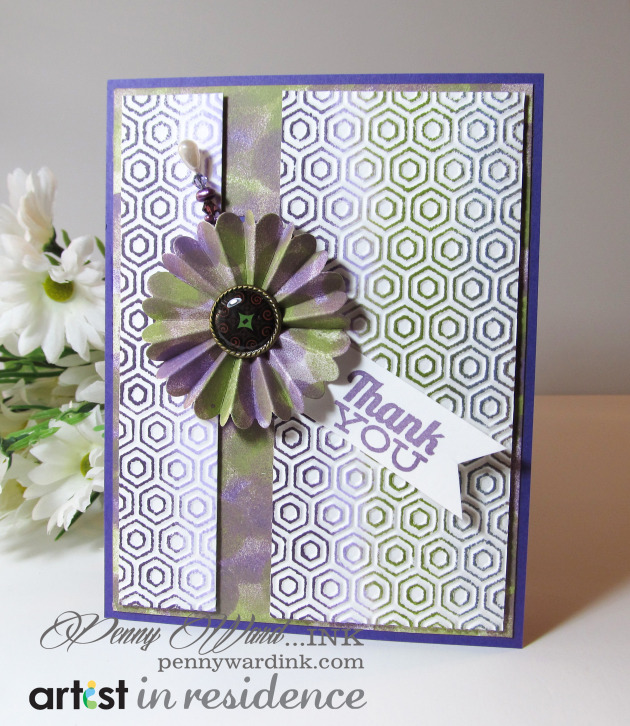
Use this fun pattern (bokeh) to create an amazing background on your next card.


Brayer and Bokeh a Thank You Card
  1. Cut white cardstock to 5¼˝x 4˝.
  2. Emboss with So Trendy folder.
  3. Brayer panel with Kaleidacolor Vineyard.
  4. Cut another piece of white cardstock a bit larger in size.
  5. Cover this whole panel using a Sponge Dauber with Memento Luxe Pistachio and Sweet Plum.
  6. Die cut two of the Rosette Blooms and adhere together to make one Rosette.
  7. Adhere the inked/die cut panel to purple card stock measuring 4¼˝ x 5½˝.
  8. Cut a small section from the brayered panel and adhere to card base with foam adhesive as shown.
  9. Attach a brad to the Rosette and adhere to card front.
  10. Stamp sentiment onto white cardstock, trim and adhere to card front.
  11. Add a stick pin with beads beneath the Rosette.
  12. Mist card with Sheer Shimmer Sparkle.
by Penny Ward

Difficulty

Intermediate

Time

45 minutes with dry time

Materials Needed

Imagine Crafts/Tsukineko:

Other supplies:

  • Spellbinders: Rosette Blooms die, So Trendy Embossing Folder
  • Penny Black:  Sunny Hello stamp set
  • Bo Bunny:  Brad
  • Darice:  Hat pin and beads
  • Craftwell:  Ebosser
  • Miscellaneous:  White and purple cardstock, brayer, adhesive, foam adhesive


Sign up for our newsletter
Facebook Pinterest Twitter YouTube Vimeo