Array ( [0] => 280 [ID] => 280 [1] => 1 [TYPEID] => 1 [2] => 0 [SECTIONID] => 0 [3] => project-details [MOD_NAME] => project-details [4] => [TITLE] => [5] => Project Details [META_TITLE] => Radiant Neon Ink for a Love with Passion Card [6] => [META_DESCRIPTION] => Radiant Neon Ink for a Love with Passion Card [7] => [META_KEYWORDS] => [8] => [BUTTON_TITLE] => [9] => [BODY] => [10] => [BODY_SIDE] => [11] => [MODULE_PROCESSING] => [12] => [MODULE_META] => [13] => project-details-head.php [MODULE_HEAD] => project-details-head.php [14] => project-details-body.php [MODULE_BODY] => project-details-body.php [15] => [MODULE_SIDE] => [16] => 0 [TOP_ORDER] => 0 [17] => 0 [HITS_UNIQUE] => 0 [18] => 0 [HITS_REPEAT] => 0 [19] => 0 [ROBOT_HITS] => 0 [20] => 0000-00-00 00:00:00 [LASTVIEWED] => 0000-00-00 00:00:00 [21] => 0000-00-00 00:00:00 [ROBOT_LASTVIEWED] => 0000-00-00 00:00:00 [22] => 0.70 [PRIORITY] => 0.70 [23] => 1 [SITEMAP] => 1 [24] => 1 [ACTIVE] => 1 [25] => 1 [DISPLAY_TITLE] => 1 [26] => 0 [SSL_MODE] => 0 [27] => 0 [EDITABLE] => 0 [28] => 0 [DELETABLE] => 0 [29] => 2013-11-05 00:00:00 [LASTUPDATED] => 2013-11-05 00:00:00 [30] => 2013-11-05 00:00:00 [CREATED] => 2013-11-05 00:00:00 )
Imagine Crafts
LearnMakeCommunityShop

Radiant Neon Ink for a Love with Passion Card

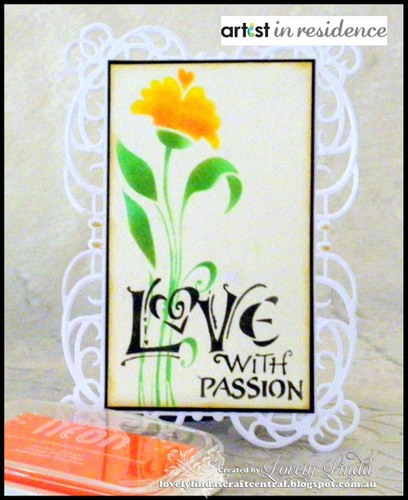
Why rubber stamp when you can achieve these beautiful results using a stencil with Radiant Neon inks.


Radiant Neon Ink for a Love with Passion Card
  1. Using the flower image on the stencil, sponge the petals using Electric Yellow and a Sponge Dauber.
     
  2. Color the stems using Electric Green and Sponge Dauber.
     
  3. To add some depth to the base of the petals, shade lightly using Electric Orange.
     
  4. Using the Sponge Dauber and Electric Coral, lightly 'dab' the flower from the base to approximately halfway up the flower to give a stippled effect.
     
  5. Without re-inking an already used Sponge Dauber, add some depth to the base of the leaves.
     
  6. Edge panel with Delicata Golden Glitz.
     
  7. Using Versafine Onyx Black, add the sentiment across the stems of the flowers.
     
  8. Trim the card slightly larger than the image.
     
  9. Layer onto black card cut slightly larger.
     
  10. Cut one (1) 5x7 Mystical Embrace Nestabilities.
     
  11. Adhere the layered stenciled image onto the die cut.
     
  12. Attach to precut card base.
by Linda Lucas

Difficulty

Intermediate

Time

1 hour

Materials Needed

IMAGINE Crafts/Tsukineko:

Miscellaneous:

  • The Crafter's Workshop - 6x6 Stencil
  • Spellbinders: 5x7 Mystical Embrace Nestabilities Card Creator, Grand Calibur Machine
  • Scrapbook Adhesives by 3L™: E-Z Adhesive Runner
  • Cardstock in white, black and cream
  • Liquid glue


Sign up for our newsletter
Facebook Pinterest Twitter YouTube Vimeo