Array ( [0] => 280 [ID] => 280 [1] => 1 [TYPEID] => 1 [2] => 0 [SECTIONID] => 0 [3] => project-details [MOD_NAME] => project-details [4] => [TITLE] => [5] => Project Details [META_TITLE] => Creative Medium Metallic Retro Picture Frame [6] => [META_DESCRIPTION] => Creative Medium Metallic Retro Picture Frame [7] => [META_KEYWORDS] => [8] => [BUTTON_TITLE] => [9] => [BODY] => [10] => [BODY_SIDE] => [11] => [MODULE_PROCESSING] => [12] => [MODULE_META] => [13] => project-details-head.php [MODULE_HEAD] => project-details-head.php [14] => project-details-body.php [MODULE_BODY] => project-details-body.php [15] => [MODULE_SIDE] => [16] => 0 [TOP_ORDER] => 0 [17] => 0 [HITS_UNIQUE] => 0 [18] => 0 [HITS_REPEAT] => 0 [19] => 0 [ROBOT_HITS] => 0 [20] => 0000-00-00 00:00:00 [LASTVIEWED] => 0000-00-00 00:00:00 [21] => 0000-00-00 00:00:00 [ROBOT_LASTVIEWED] => 0000-00-00 00:00:00 [22] => 0.70 [PRIORITY] => 0.70 [23] => 1 [SITEMAP] => 1 [24] => 1 [ACTIVE] => 1 [25] => 1 [DISPLAY_TITLE] => 1 [26] => 0 [SSL_MODE] => 0 [27] => 0 [EDITABLE] => 0 [28] => 0 [DELETABLE] => 0 [29] => 2013-11-05 00:00:00 [LASTUPDATED] => 2013-11-05 00:00:00 [30] => 2013-11-05 00:00:00 [CREATED] => 2013-11-05 00:00:00 )
Imagine Crafts
LearnMakeCommunityShop

Creative Medium Metallic Retro Picture Frame

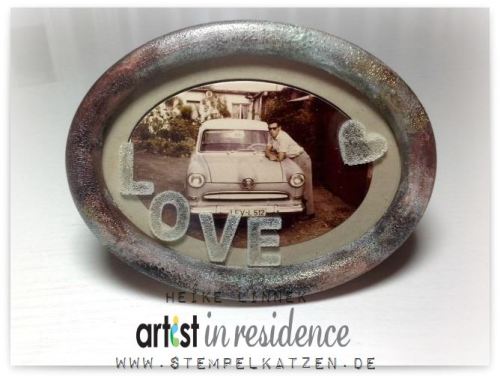
A few days after we were asked to do an upcycling project I got hold of an old and ugly plastic picture frame. This technique using Creative Medium and Embossing Powder is very easy to do and gives a true metallic retro effect.


Creative Medium Metallic Retro Picture Frame

Directions:

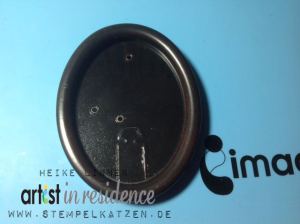
1. Clean the surface and disassemble the frame.

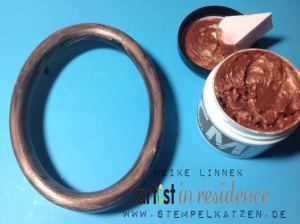
2. Cover the surface with Creative Medium Metallic Copper using Ink Blushers.

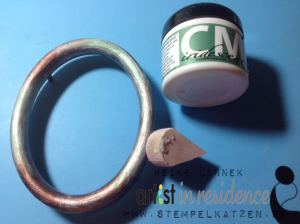
3. Apply Creative Medium Iridescent Chartreuse onto some areas. Don’t let it dry.


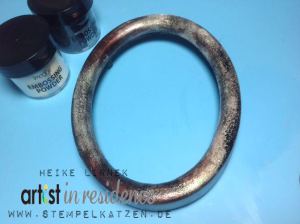
4. Add some Clear and a little bit of Black Embossing Powder. Gently heat set it with a heat tool.

5. Choose a heat-proof molding form and fill it carefully with Clear Embossing Powder.

6. Melt the embossing powder in the oven or use a similar process. If using the over (or toaster oven), choose broil setting if possible and start with a lower temperature. It’s important not to go away from the oven, always have an eye on what happens inside! If the Powder gets clear, it’s time to take it out. Let everything completely cool down before releasing the characters.


7. Rebuild the picture frame and adhere the lettering or embellishment.

by Heike Linnek

Difficulty

Intermediate

Time

1 Hour

Materials Needed

IMAGINE Crafts featuring Tsukineko:

Other Supplies

  • Spellbinders Nestabilities Petite Ovals Large
  • Stampin Up!: Alphanumeric Simply Pressed Clay Mold
  • Miscellaneous: old photo frame; heater tool, glue of choice, stove


Sign up for our newsletter
Facebook Pinterest Twitter YouTube Vimeo