Array ( [0] => 280 [ID] => 280 [1] => 1 [TYPEID] => 1 [2] => 0 [SECTIONID] => 0 [3] => project-details [MOD_NAME] => project-details [4] => [TITLE] => [5] => Project Details [META_TITLE] => Radiant Neon Ink for an OH HAPPY DAY Monoprinted Card [6] => [META_DESCRIPTION] => Radiant Neon Ink for an OH HAPPY DAY Monoprinted Card [7] => [META_KEYWORDS] => [8] => [BUTTON_TITLE] => [9] => [BODY] => [10] => [BODY_SIDE] => [11] => [MODULE_PROCESSING] => [12] => [MODULE_META] => [13] => project-details-head.php [MODULE_HEAD] => project-details-head.php [14] => project-details-body.php [MODULE_BODY] => project-details-body.php [15] => [MODULE_SIDE] => [16] => 0 [TOP_ORDER] => 0 [17] => 0 [HITS_UNIQUE] => 0 [18] => 0 [HITS_REPEAT] => 0 [19] => 0 [ROBOT_HITS] => 0 [20] => 0000-00-00 00:00:00 [LASTVIEWED] => 0000-00-00 00:00:00 [21] => 0000-00-00 00:00:00 [ROBOT_LASTVIEWED] => 0000-00-00 00:00:00 [22] => 0.70 [PRIORITY] => 0.70 [23] => 1 [SITEMAP] => 1 [24] => 1 [ACTIVE] => 1 [25] => 1 [DISPLAY_TITLE] => 1 [26] => 0 [SSL_MODE] => 0 [27] => 0 [EDITABLE] => 0 [28] => 0 [DELETABLE] => 0 [29] => 2013-11-05 00:00:00 [LASTUPDATED] => 2013-11-05 00:00:00 [30] => 2013-11-05 00:00:00 [CREATED] => 2013-11-05 00:00:00 )
Imagine Crafts
LearnMakeCommunityShop

Radiant Neon Ink for an OH HAPPY DAY Monoprinted Card

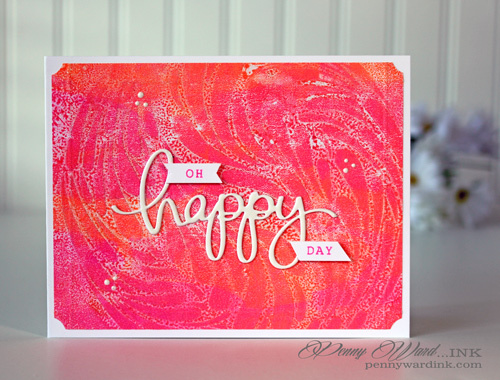
New trends in papercrafting and mixed media are using a Gelli Plate. I have found that the Craft Mat by Imagine Crafts works like a charm without the added expense. Let me show you how easy it is to incorporate this technique into your next card project.


Radiant Neon Ink for an OH HAPPY DAY Monoprinted Card

Directions:

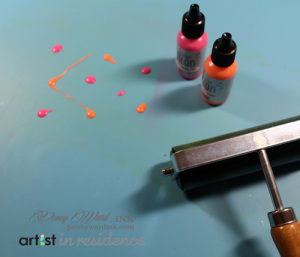
On your Craft Mat, squirt a few drops of Radiant Neon Electric Pink and Electric Coral from the inkers. Using a brayer, spread the inks around so you are left with a thin film of color on the mat.

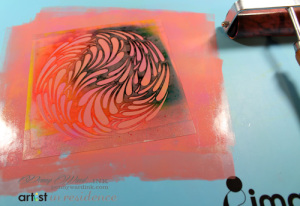
Die cut stencil with Silhouette Cameo using cardstock or acrylic sheet. Lay stencil over inked Craft Mat. Using brayer, roll it over the stencil several times. Lift stencil to reveal a pattern.

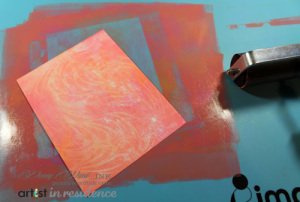
Cut white card stock 4 x 5.25 inches. Lay it over the stenciled/inked Craft Mat. Brayer again on top of white cardstock. Lift cardstock to reveal a beautiful Faux Gelli Plate background.

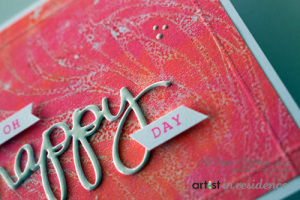
Using a scoring board, emboss lines on card front at 1/4 inch on all sides. Using a circle punch, notch corners. Die cut sentiment two times, adhere together for dimension, and adhere to card front. Coat with irRESISTible Pico Wedding Dress for a glossy finish. Stamp and trim the rest of the sentiment on to white cardstock and adhere to card front over die cut word using foam adhesive. Adhere card front to a base card of white cardstock cut to 4.25 x 11 inches, then folded in half.

by Penny Ward

Difficulty

Beginner

Time

½ an hour

Materials Needed

Imagine Crafts featuring Tsukineko:

Other Supplies:

  • Mama Elephant:  Happy Script die, Happy Everything stamp set
  • Scor-Pal:  Scoring board
  • Craftwell:  eBosser
  • Silhouette: Stencil #55272 (from online store), Silhouette Cameo
  • Miscellaneous:  white cardstock, brayer, foam adhesive, your favorite adhesive, circle punch


Sign up for our newsletter
Facebook Pinterest Twitter YouTube Vimeo