Array ( [0] => 280 [ID] => 280 [1] => 1 [TYPEID] => 1 [2] => 0 [SECTIONID] => 0 [3] => project-details [MOD_NAME] => project-details [4] => [TITLE] => [5] => Project Details [META_TITLE] => Easter Bunny Crafts - Color Ears with StazOn [6] => [META_DESCRIPTION] => Easter Bunny Crafts - Color Ears with StazOn [7] => [META_KEYWORDS] => [8] => [BUTTON_TITLE] => [9] => [BODY] => [10] => [BODY_SIDE] => [11] => [MODULE_PROCESSING] => [12] => [MODULE_META] => [13] => project-details-head.php [MODULE_HEAD] => project-details-head.php [14] => project-details-body.php [MODULE_BODY] => project-details-body.php [15] => [MODULE_SIDE] => [16] => 0 [TOP_ORDER] => 0 [17] => 0 [HITS_UNIQUE] => 0 [18] => 0 [HITS_REPEAT] => 0 [19] => 0 [ROBOT_HITS] => 0 [20] => 0000-00-00 00:00:00 [LASTVIEWED] => 0000-00-00 00:00:00 [21] => 0000-00-00 00:00:00 [ROBOT_LASTVIEWED] => 0000-00-00 00:00:00 [22] => 0.70 [PRIORITY] => 0.70 [23] => 1 [SITEMAP] => 1 [24] => 1 [ACTIVE] => 1 [25] => 1 [DISPLAY_TITLE] => 1 [26] => 0 [SSL_MODE] => 0 [27] => 0 [EDITABLE] => 0 [28] => 0 [DELETABLE] => 0 [29] => 2013-11-05 00:00:00 [LASTUPDATED] => 2013-11-05 00:00:00 [30] => 2013-11-05 00:00:00 [CREATED] => 2013-11-05 00:00:00 )
Imagine Crafts
LearnMakeCommunityShop

Easter Bunny Crafts - Color Ears with StazOn

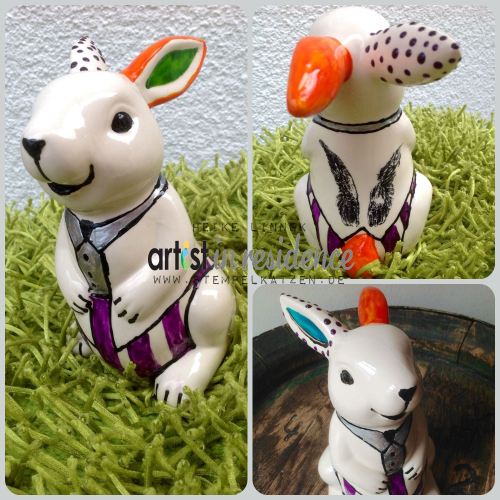
Studio Glaze is a real member of the StazOn product family. It works on nearly every surface. This was a boring, plain white glossy porcelain bunny before I doodled it colorful with the Glaze.


Easter Bunny Crafts - Color Ears with StazOn

Directions:


1. Begin by cleaning the plain white porcelain bunny with a baby wipe (or similar). To ensure a perfect result, let the StazOn Studio Glaze dry after every step.

Faulty areas can be corrected with a baby wipe, as long as the color isn’t dried.

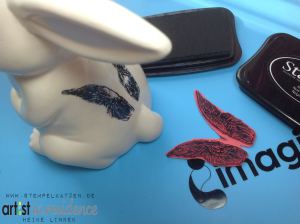
2. First stamp the wings using StazOn Jet Black.

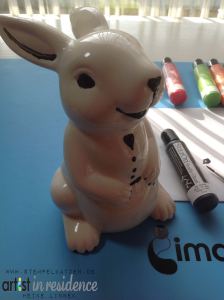
3. Accent the face and the paws with Studio Glaze in Jet Black.

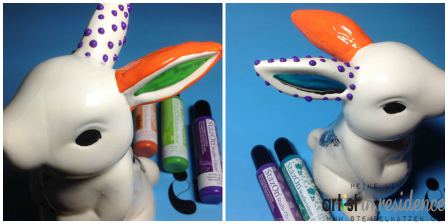
4. Create colorful ears using Studio Glaze in Gothic Purple, Cactus Green and Emerald City. Apply the colors directly from the bottles.

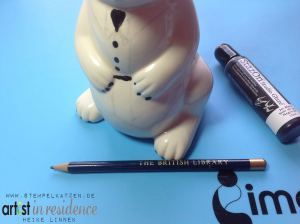
5. Sometimes it’s helpful to mark the next step with a pencil before adding the Studio Glaze.

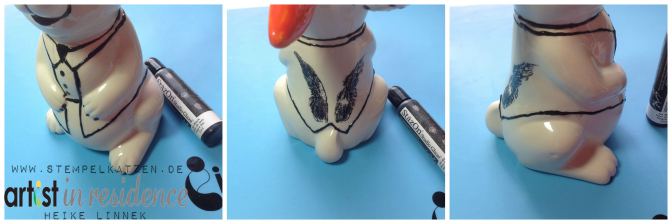
6. Draw the jacket out line in Jet Black.

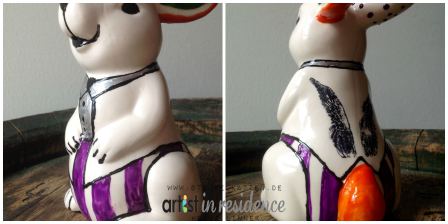
7. Continue to color the Bunny as you imagine it. This one is wearing a shirt in Silver and striped trousers in Gothic Purple.

by Heike Linnek

Difficulty

Beginner

Time

About an hour + drying time

Materials Needed

Imagine Crafts featuring Tsukineko:

Other Supplies:

  • Viva Las Vegas Stamps!: Wings from Plate #918
  • Miscellaneous: porcelain rabbit, pencil, brush


Sign up for our newsletter
Facebook Pinterest Twitter YouTube Vimeo