Array ( [0] => 280 [ID] => 280 [1] => 1 [TYPEID] => 1 [2] => 0 [SECTIONID] => 0 [3] => project-details [MOD_NAME] => project-details [4] => [TITLE] => [5] => Project Details [META_TITLE] => Delicata Ink for Vintage Sweet Valentine's Day Card [6] => [META_DESCRIPTION] => Delicata Ink for Vintage Sweet Valentine's Day Card [7] => [META_KEYWORDS] => [8] => [BUTTON_TITLE] => [9] => [BODY] => [10] => [BODY_SIDE] => [11] => [MODULE_PROCESSING] => [12] => [MODULE_META] => [13] => project-details-head.php [MODULE_HEAD] => project-details-head.php [14] => project-details-body.php [MODULE_BODY] => project-details-body.php [15] => [MODULE_SIDE] => [16] => 0 [TOP_ORDER] => 0 [17] => 0 [HITS_UNIQUE] => 0 [18] => 0 [HITS_REPEAT] => 0 [19] => 0 [ROBOT_HITS] => 0 [20] => 0000-00-00 00:00:00 [LASTVIEWED] => 0000-00-00 00:00:00 [21] => 0000-00-00 00:00:00 [ROBOT_LASTVIEWED] => 0000-00-00 00:00:00 [22] => 0.70 [PRIORITY] => 0.70 [23] => 1 [SITEMAP] => 1 [24] => 1 [ACTIVE] => 1 [25] => 1 [DISPLAY_TITLE] => 1 [26] => 0 [SSL_MODE] => 0 [27] => 0 [EDITABLE] => 0 [28] => 0 [DELETABLE] => 0 [29] => 2013-11-05 00:00:00 [LASTUPDATED] => 2013-11-05 00:00:00 [30] => 2013-11-05 00:00:00 [CREATED] => 2013-11-05 00:00:00 )
Imagine Crafts
LearnMakeCommunityShop

Delicata Ink for Vintage Sweet Valentine's Day Card

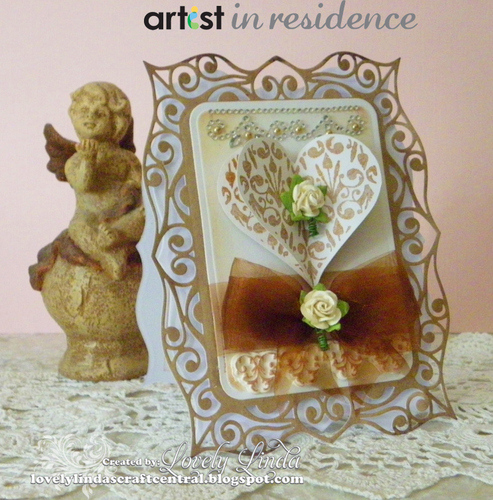
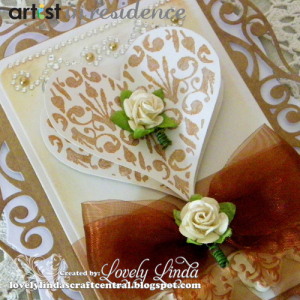
Valentines Day - the day for Lovers all over the world.  What better way to express the 'matters of the heart' than a handmade card using the most divine ink Delicata Bronze Burst - as the name suggests - it is spectacular!


Delicata Ink for Vintage Sweet Valentine's Day Card


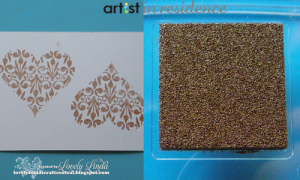
1. Stamp two copies of the image using Delicata Bronze Burst.

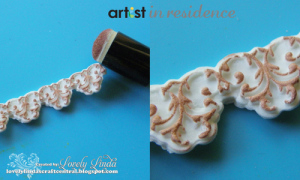
2. Sponge the border embellishment using Delicata Bronze Burst and a Sponge Dauber.

3. Cut/emboss one (1) Round Corners Basics Die from white cardstock.

4. Using the die as a stencil, color the edges using Delicata Golden Glitz and a Sponge Dauber.

5. Precut card base using Labels Forty and white cardstock.

6. Cut/emboss one (1) Labels Forty Decorative Accents from DCWV patterned paper.

7. Adhere to card base using double-sided tape.

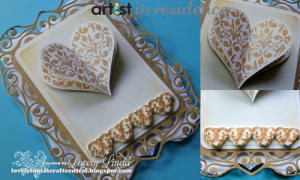
8. Hand cut both stamped hearts. Score one heart down the center and adhere to the first heart using liquid glue.

NOTE: A flat backed bead can be added between the layers of the heart for dimension.

9. Adhere to the top portion of the card base.

10. Attach a Mulberry Paper Rose to the heart center using liquid glue.

11. Adhere the inked handmade border to the lower portion on the card.

12. Add sheer ribbon across the white layer.

13. Tuck the ends under the layer - add more glue if required.

14.  Add double bow to the center of the ribbon using liquid glue.

15. Secure a Mulberry Paper Flower to the center of the bow.

by Linda Lucas

Difficulty

Intermediate

Time

less than an hour

Materials Needed

Imagine Crafts/Tsukineko:

Other Supplies:

  • Spellbinders: Labels Forty, Labels Forty Decorative Accents, Round Corner Basics B, Grand Calibur Machine
  • Penny Black Inc: Heart Swatches clear stamp set
  • Prima Marketing Inc: Small Paper Roses
  • May Arts Ribbon: Sheer Ribbon
  • DCWV: Tattered Time mat stack
  • Want2Scrap: Beautiful Bling Borders, Baby Bling - LeCreme Pearls
  • Miscellaneous: white cardstock, adhesive of choice, acrylic block; handmade border embellishment


Sign up for our newsletter
Facebook Pinterest Twitter YouTube Vimeo