Array ( [0] => 280 [ID] => 280 [1] => 1 [TYPEID] => 1 [2] => 0 [SECTIONID] => 0 [3] => project-details [MOD_NAME] => project-details [4] => [TITLE] => [5] => Project Details [META_TITLE] => Radiant Neon Ink to Make a Money Gift Greeting Card [6] => [META_DESCRIPTION] => Radiant Neon Ink to Make a Money Gift Greeting Card [7] => [META_KEYWORDS] => [8] => [BUTTON_TITLE] => [9] => [BODY] => [10] => [BODY_SIDE] => [11] => [MODULE_PROCESSING] => [12] => [MODULE_META] => [13] => project-details-head.php [MODULE_HEAD] => project-details-head.php [14] => project-details-body.php [MODULE_BODY] => project-details-body.php [15] => [MODULE_SIDE] => [16] => 0 [TOP_ORDER] => 0 [17] => 0 [HITS_UNIQUE] => 0 [18] => 0 [HITS_REPEAT] => 0 [19] => 0 [ROBOT_HITS] => 0 [20] => 0000-00-00 00:00:00 [LASTVIEWED] => 0000-00-00 00:00:00 [21] => 0000-00-00 00:00:00 [ROBOT_LASTVIEWED] => 0000-00-00 00:00:00 [22] => 0.70 [PRIORITY] => 0.70 [23] => 1 [SITEMAP] => 1 [24] => 1 [ACTIVE] => 1 [25] => 1 [DISPLAY_TITLE] => 1 [26] => 0 [SSL_MODE] => 0 [27] => 0 [EDITABLE] => 0 [28] => 0 [DELETABLE] => 0 [29] => 2013-11-05 00:00:00 [LASTUPDATED] => 2013-11-05 00:00:00 [30] => 2013-11-05 00:00:00 [CREATED] => 2013-11-05 00:00:00 )
Imagine Crafts
LearnMakeCommunityShop

Radiant Neon Ink to Make a Money Gift Greeting Card

As soon as I heard the theme for this project was gift card holders, I immediately thought of a pocket card. Of course with my own little twist. It is the perfect way to be a little bit 'sneaky' with an unexpected gift...as you will see from my tutorial. Enjoy!


Radiant Neon Ink to Make a Money Gift Greeting Card

Directions

AIR 2015_LL_May_Pocket_Card_Tutorial_Step 2

1. Cut patterned paper to 3 3/4" x 5 3/4"

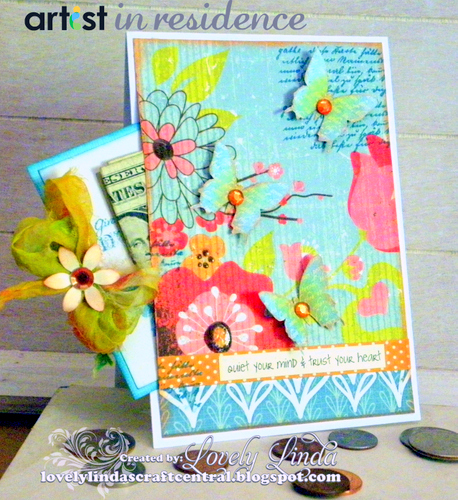
2. Sponge around the edges using Electric Orange and a sponge dauber

3. Using Teal Blue Ink, stamp the script image into the top right corner

4. Stamp four (4) butterflies using Teal Blue - put one aside

5. Hand cut/fussy cut the remaining three (3) butterflies

6. Sponge the edges of the butterflies using Electric orange with a spounge dauber. You will also want to sponge the center of the butterflies using Electric Yellow

7. Adhere butterflies to patterned paper as shown in the photo

AIR 2015_LL_May_Pocket_Card_Tutorial_Step 1

9. Trim around the remaining butterfly to form a rectangle, " x  "

10. Layer onto slightly larger blue cardstock using double sided tape and punch a notch into the right side of the card

11. Thread ribbon through the notch and tie a double bow, adding liquid glue under the bow to secure it

12. Adhere a small flower to the center of the bow and add brown bling to the center of the flowers and the butterflies - put the tag aside once you are done

AIR 2015_LL_May_Pocket_Card_Tutorial_Step 3

13. Attach strong tape to the edges of the card - leaving 4" without tape to form the pocket

14. Adhere to the white card base

Once you have adhered everything together, slide the tag into the pocket and tuck the money or gift card in with the tag!

by Linda Lucas

Difficulty

Intermediate

Time

1/2 hour + dry time

Materials Needed

Imagine Crafts/Tsukineko:

Other

  • Penny Black Inc: Butterfly Stamp
  • Spellbinders: Grand Calibur Die Cutting and Embossing Machine
  • Miscellaneous: Kaisercraft patterned paper - White and pink cardstock, liquid glue, double-sided tape, foam tape, scissors, and sentiment


Sign up for our newsletter
Facebook Pinterest Twitter YouTube Vimeo