Array ( [0] => 280 [ID] => 280 [1] => 1 [TYPEID] => 1 [2] => 0 [SECTIONID] => 0 [3] => project-details [MOD_NAME] => project-details [4] => [TITLE] => [5] => Project Details [META_TITLE] => Using StazOn Studio Glaze with Stencils [6] => [META_DESCRIPTION] => Using StazOn Studio Glaze with Stencils [7] => [META_KEYWORDS] => [8] => [BUTTON_TITLE] => [9] => [BODY] => [10] => [BODY_SIDE] => [11] => [MODULE_PROCESSING] => [12] => [MODULE_META] => [13] => project-details-head.php [MODULE_HEAD] => project-details-head.php [14] => project-details-body.php [MODULE_BODY] => project-details-body.php [15] => [MODULE_SIDE] => [16] => 0 [TOP_ORDER] => 0 [17] => 0 [HITS_UNIQUE] => 0 [18] => 0 [HITS_REPEAT] => 0 [19] => 0 [ROBOT_HITS] => 0 [20] => 0000-00-00 00:00:00 [LASTVIEWED] => 0000-00-00 00:00:00 [21] => 0000-00-00 00:00:00 [ROBOT_LASTVIEWED] => 0000-00-00 00:00:00 [22] => 0.70 [PRIORITY] => 0.70 [23] => 1 [SITEMAP] => 1 [24] => 1 [ACTIVE] => 1 [25] => 1 [DISPLAY_TITLE] => 1 [26] => 0 [SSL_MODE] => 0 [27] => 0 [EDITABLE] => 0 [28] => 0 [DELETABLE] => 0 [29] => 2013-11-05 00:00:00 [LASTUPDATED] => 2013-11-05 00:00:00 [30] => 2013-11-05 00:00:00 [CREATED] => 2013-11-05 00:00:00 )
Imagine Crafts
LearnMakeCommunityShop

Using StazOn Studio Glaze with Stencils

StazOn Studio Glaze creates amazing results on paper, acetate and a variety of other surfaces. See how easy it is to use your favorite stencils to create patterns with StazOn Studio Glaze.


Using StazOn Studio Glaze with Stencils

1. Place your stencil over a sheet of acetate and begin applying the first color of StazOn Studio Glaze into the stencil. Start with the outling (against the edge of the stencil) and work in towards the middle of the "empty" space. Becaue StazOn Studio Glaze is self leveling do not apply too much of the product or it will go underneath the stencil.

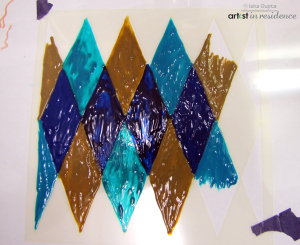
2. Continue adding various colors of Studio Glaze in the same manner. For this sample I used Midnight Blue, Spiced Chai, and Emerald City.

3. Allow the Studio Glaze to begin setting a bit in the stencil before removing the stencil, this will help keep the colors serperated. You can use a heat gun with light heat to help speed this process. There only needs to be enough heat to set the edges. Be careful because Studio Glaze can over heat quickly and create bubbles, not to mention possilbe damage to your stencil and/or acetate with over heating.

4. Recommended air drying time for Studio Glaze is overnight.

5. Once your pattern is completely dry, add to your next mixed media project!
 

by Isha Gupta

Difficulty

Beginner

Time

Varies depending on project

Materials Needed

IMAGINE Crafts featuring Tsukineko:

Other Supplies:

  • Acetate sheets
  • Favorite stencils


Sign up for our newsletter
Facebook Pinterest Twitter YouTube Vimeo