Array ( [0] => 280 [ID] => 280 [1] => 1 [TYPEID] => 1 [2] => 0 [SECTIONID] => 0 [3] => project-details [MOD_NAME] => project-details [4] => [TITLE] => [5] => Project Details [META_TITLE] => irRESISTible for a Unique Merry Christmas Card [6] => [META_DESCRIPTION] => irRESISTible for a Unique Merry Christmas Card [7] => [META_KEYWORDS] => [8] => [BUTTON_TITLE] => [9] => [BODY] => [10] => [BODY_SIDE] => [11] => [MODULE_PROCESSING] => [12] => [MODULE_META] => [13] => project-details-head.php [MODULE_HEAD] => project-details-head.php [14] => project-details-body.php [MODULE_BODY] => project-details-body.php [15] => [MODULE_SIDE] => [16] => 0 [TOP_ORDER] => 0 [17] => 0 [HITS_UNIQUE] => 0 [18] => 0 [HITS_REPEAT] => 0 [19] => 0 [ROBOT_HITS] => 0 [20] => 0000-00-00 00:00:00 [LASTVIEWED] => 0000-00-00 00:00:00 [21] => 0000-00-00 00:00:00 [ROBOT_LASTVIEWED] => 0000-00-00 00:00:00 [22] => 0.70 [PRIORITY] => 0.70 [23] => 1 [SITEMAP] => 1 [24] => 1 [ACTIVE] => 1 [25] => 1 [DISPLAY_TITLE] => 1 [26] => 0 [SSL_MODE] => 0 [27] => 0 [EDITABLE] => 0 [28] => 0 [DELETABLE] => 0 [29] => 2013-11-05 00:00:00 [LASTUPDATED] => 2013-11-05 00:00:00 [30] => 2013-11-05 00:00:00 [CREATED] => 2013-11-05 00:00:00 )
Imagine Crafts
LearnMakeCommunityShop

irRESISTible for a Unique Merry Christmas Card

Learn how easy it is to transform ordinary into extraordinary with IMAGINE Crafts sprays.


irRESISTible for a Unique Merry Christmas Card
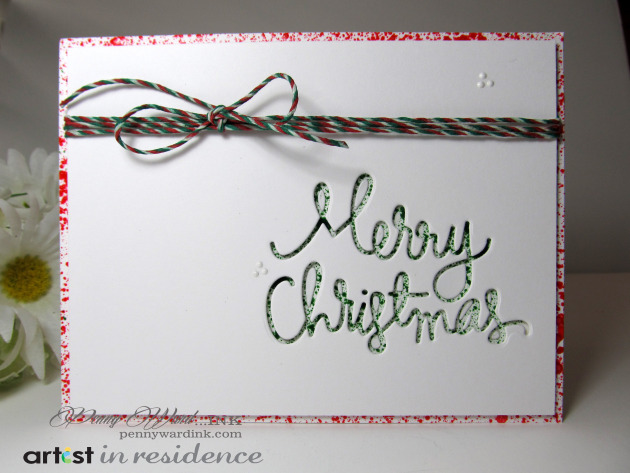
  1. Cut/score white cardstock to create finished card base to measure 4¼˝ x 5½˝.
  2. Die cut "Merry Christmas" greeting from white cardstock.
  3. Cut a piece of white cardstock to 4¼˝ x 5½˝.
  4. Mask off center and spritz with irRESISTible Lady Bug; allow to dry completely.
  5. Next mask off the outer edges and spritz with irRESISTible Cottage Ivy and let dry.
  6. On the Craft Mat, make tiny dots using irRESISTible Pico in Wedding Dress and allow to dry completely. I make quite a few on the edge of my mat so I have some ready for other projects.
  7. Wrap card front with twine and tie into bow.
  8. Adhere die cut card piece to the textured layering piece with foam adhesive.
  9. Insert tiny pieces of greeting back into place using a QuickStik and adhesive.
  10. Embellish card front using Pico Wedding Dress to create dimensional dots as desired.
  11. Adhere panel to the card base.
by Penny Ward

Difficulty

Beginner

Time

½ hour + dry time

Materials Needed

Imagine Crafts/Tsukineko:

Other supplies:

  • Simon Says Stamp: Merry Christmas die
  • Lawn Fawn: Christmas Twine
  • Craftwell: Ebosser
  • Life Style Crafts: QuickStik
  • Miscellaneous: white cardstock, dimensional foam adhesive, adhesive


Sign up for our newsletter
Facebook Pinterest Twitter YouTube Vimeo