Array ( [0] => 280 [ID] => 280 [1] => 1 [TYPEID] => 1 [2] => 0 [SECTIONID] => 0 [3] => project-details [MOD_NAME] => project-details [4] => [TITLE] => [5] => Project Details [META_TITLE] => VersaFine and Embossing to Make a Winter in Paris Card [6] => [META_DESCRIPTION] => VersaFine and Embossing to Make a Winter in Paris Card [7] => [META_KEYWORDS] => [8] => [BUTTON_TITLE] => [9] => [BODY] => [10] => [BODY_SIDE] => [11] => [MODULE_PROCESSING] => [12] => [MODULE_META] => [13] => project-details-head.php [MODULE_HEAD] => project-details-head.php [14] => project-details-body.php [MODULE_BODY] => project-details-body.php [15] => [MODULE_SIDE] => [16] => 0 [TOP_ORDER] => 0 [17] => 0 [HITS_UNIQUE] => 0 [18] => 0 [HITS_REPEAT] => 0 [19] => 0 [ROBOT_HITS] => 0 [20] => 0000-00-00 00:00:00 [LASTVIEWED] => 0000-00-00 00:00:00 [21] => 0000-00-00 00:00:00 [ROBOT_LASTVIEWED] => 0000-00-00 00:00:00 [22] => 0.70 [PRIORITY] => 0.70 [23] => 1 [SITEMAP] => 1 [24] => 1 [ACTIVE] => 1 [25] => 1 [DISPLAY_TITLE] => 1 [26] => 0 [SSL_MODE] => 0 [27] => 0 [EDITABLE] => 0 [28] => 0 [DELETABLE] => 0 [29] => 2013-11-05 00:00:00 [LASTUPDATED] => 2013-11-05 00:00:00 [30] => 2013-11-05 00:00:00 [CREATED] => 2013-11-05 00:00:00 )
Imagine Crafts
LearnMakeCommunityShop

VersaFine and Embossing to Make a Winter in Paris Card

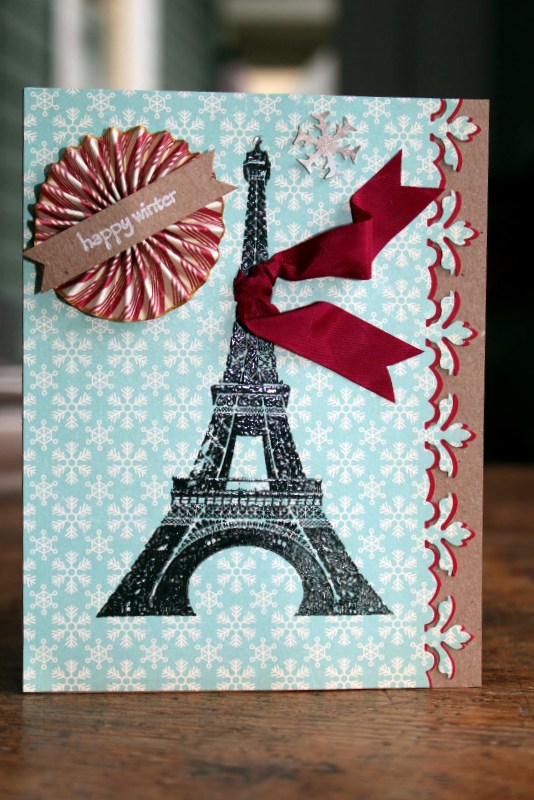
An Eiffel-tower themed winter card.


VersaFine and Embossing to Make a Winter in Paris Card
  1. Cut snowflake cardstock 5.5” x 4.25” and cut one long side with Fleur de Lis edge punch. Cut red cardstock 5.5” x 1” and cut one long side with Fleur de Lis edge punch.
     
  2. Stamp “Eiffel Tower” on center of snowflake paper with Onyx Black Versafine and emboss with clear powder.
     
  3. Add small rhinestone to top of tower.
     
  4. Cut a ¼” slit along each side of Eiffel Tower approx. 1.25” from top of tower.
     
  5. Cut a 2 ¾” strip of red ribbon and cut in a “v” on each end.
     
  6. Lace ribbon through slits on each side of Eiffel tower and knot.
     
  7. Using small glue dots, adhere edges of ribbon randomly to right side of Eiffel Tower.
     
  8. Adhere red Fleur de Lis to back of snowflake paper and offset slightly.
     
  9. Adhere snowflake paper to Kraft cardstock aligning left side of snowflake paper with fold of Kraft card. This will leave approx ½” of exposed Kraft paper on right side of card.
     
  10. Take 2 strips of “Jolly” paper 8.5” x ¾”, run one long edge through the Delicata inkpad, and let dry completely. This will be the outer edge of medallion.
     
  11. Fold strips every quarter inch alternating direction in an accordion fold; this is easiest if you are able to score paper in 1/4” increments.
     
  12. Adhere 2 folded strips of “Jolly” paper at ends and fold into circle. Glue on center of backside with hot glue gun. You’ll need to hold it for a few minutes for the glue to dry and set.
     
  13. Adhere medallion of “Jolly” paper to card. Stamp “happy winter” with Cloud White Versamagic on scrap of Kraft paper and cut a “v” on each edge. Adhere to center of medallion and then to snowflake paper to the left of the tower.
by Maureen Cronin

Difficulty

Beginner

Time

1 hour

Materials Needed

From IMAGINE Crafts / Tsukineko:

  • VersaMagic in Cloud White
  • VersaFine in Onyx Black
  • Clear Embossing Powder 
  • Delicata in Golden Glitz
  • Sponge Dauber
  • “Eiffel Tower” clear stamp by Stampendous
  • “happy winter” stamp by Impress
  • EK Sucess Fleur de Lis edge punch
  • red cardstock, Kraft cardstock
  • October Afternoon “Holiday Style” snowflake paper
  • Authentique “Jolly” Paper
  • Red ribbon
  • Dimensional tape
  • Rhinestone
  • Scoring tool (optional)

Download project sheet (PDF)


Sign up for our newsletter
Facebook Pinterest Twitter YouTube Vimeo