Array ( [0] => 280 [ID] => 280 [1] => 1 [TYPEID] => 1 [2] => 0 [SECTIONID] => 0 [3] => project-details [MOD_NAME] => project-details [4] => [TITLE] => [5] => Project Details [META_TITLE] => Happy Thanksgiving Card with Fireworks Spray [6] => [META_DESCRIPTION] => Happy Thanksgiving Card with Fireworks Spray [7] => [META_KEYWORDS] => [8] => [BUTTON_TITLE] => [9] => [BODY] => [10] => [BODY_SIDE] => [11] => [MODULE_PROCESSING] => [12] => [MODULE_META] => [13] => project-details-head.php [MODULE_HEAD] => project-details-head.php [14] => project-details-body.php [MODULE_BODY] => project-details-body.php [15] => [MODULE_SIDE] => [16] => 0 [TOP_ORDER] => 0 [17] => 0 [HITS_UNIQUE] => 0 [18] => 0 [HITS_REPEAT] => 0 [19] => 0 [ROBOT_HITS] => 0 [20] => 0000-00-00 00:00:00 [LASTVIEWED] => 0000-00-00 00:00:00 [21] => 0000-00-00 00:00:00 [ROBOT_LASTVIEWED] => 0000-00-00 00:00:00 [22] => 0.70 [PRIORITY] => 0.70 [23] => 1 [SITEMAP] => 1 [24] => 1 [ACTIVE] => 1 [25] => 1 [DISPLAY_TITLE] => 1 [26] => 0 [SSL_MODE] => 0 [27] => 0 [EDITABLE] => 0 [28] => 0 [DELETABLE] => 0 [29] => 2013-11-05 00:00:00 [LASTUPDATED] => 2013-11-05 00:00:00 [30] => 2013-11-05 00:00:00 [CREATED] => 2013-11-05 00:00:00 )
Imagine Crafts
LearnMakeCommunityShop

Happy Thanksgiving Card with Fireworks Spray

This Thanksgiving card shimmers with Brilliance Ink and Fireworks! Craft Spray.


Happy Thanksgiving Card with Fireworks Spray
  1. Cut cardstock as follows: 

    Pumpkin Cardstock: Cut/score to finished card size A2- 4-1/4 x 5-1/2" inches when folded; approx 3 inch square for punching out pumpkin pieces
    Chocolate Cardstock (background layer): 4 x 5-1/4 inches
    Lime Cardstock: 1st piece: 3/4 x 4-1/2" inches (layer); 2nd piece: 3/4 x 3" (sentiment)
    White Cardstock:  1/2 x 2-3/4" (sentiment)
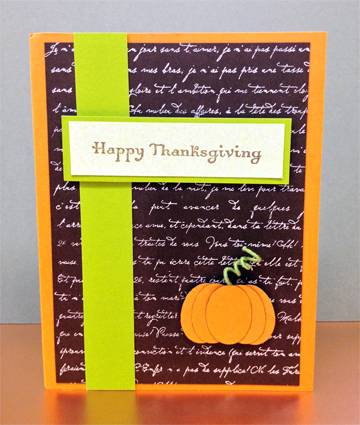
  2. Stamp words background stamp onto chocolate cardstock piece with Brilliance Starlite Silver.

  3. Spray white cardstock piece with Fireworks! Bamboo Leaves.  Once dry, stamp "Happy Thanksgiving" with VersaColor Pinecone and then heat emboss with Clear Embossing Powder.

  4. Adhere onto lime cardstock layering piece, set aside.

  5. Using small oval punch, punch five ovals from pumpkin cardstock.  Edge each oval piece with Memento Rich Cocoa Marker.

  6. Starting with one oval in the center, fan out 2 ovals on each side and adhere together.

  7. Cut a 2 inch piece of green wrapped wire and twist around a small pen or stick to create a "pigtail."  Adhere to the backside of the pumpkin at the top to create a stem.

  8. Assemble in the following order:

    1st  Stamped chocolate layer piece directly onto the pumpkin card base.
    2nd  Lime cardstock piece, vertically approx ¾ inch from the left edge of the card.
    3rd  Sentiment centered approx one inch from top or card with dimensional tape
    4th  Pumpkin towards right bottom of the card with dimensional tape

by Maureen Cronin

Difficulty

Beginner - Easy

Time

1-2 hours

Materials Needed

From IMAGINE Crafts / Tsukineko

  • Embossing Powder in Clear
  • Fireworks! Craft Spray in Bamboo Leaves
  • Brilliance in Starlite Silver
  • VersaColor in Pinecone
  • Memento Marker in Rich Cocoa
     
  • rubber stamps from AMuse: words background, "Happy Thanksgiving"
  • cardstock: pumpkin, chocolate, lime green
  • small oval punch (7/8" size)
  • dimensional tape
  • adhesive
  • green wrapped (floral) wire


Sign up for our newsletter
Facebook Pinterest Twitter YouTube Vimeo