Array ( [0] => 280 [ID] => 280 [1] => 1 [TYPEID] => 1 [2] => 0 [SECTIONID] => 0 [3] => project-details [MOD_NAME] => project-details [4] => [TITLE] => [5] => Project Details [META_TITLE] => Give Thanks Greeting Card with StazOn Studio Glaze [6] => [META_DESCRIPTION] => Give Thanks Greeting Card with StazOn Studio Glaze [7] => [META_KEYWORDS] => [8] => [BUTTON_TITLE] => [9] => [BODY] => [10] => [BODY_SIDE] => [11] => [MODULE_PROCESSING] => [12] => [MODULE_META] => [13] => project-details-head.php [MODULE_HEAD] => project-details-head.php [14] => project-details-body.php [MODULE_BODY] => project-details-body.php [15] => [MODULE_SIDE] => [16] => 0 [TOP_ORDER] => 0 [17] => 0 [HITS_UNIQUE] => 0 [18] => 0 [HITS_REPEAT] => 0 [19] => 0 [ROBOT_HITS] => 0 [20] => 0000-00-00 00:00:00 [LASTVIEWED] => 0000-00-00 00:00:00 [21] => 0000-00-00 00:00:00 [ROBOT_LASTVIEWED] => 0000-00-00 00:00:00 [22] => 0.70 [PRIORITY] => 0.70 [23] => 1 [SITEMAP] => 1 [24] => 1 [ACTIVE] => 1 [25] => 1 [DISPLAY_TITLE] => 1 [26] => 0 [SSL_MODE] => 0 [27] => 0 [EDITABLE] => 0 [28] => 0 [DELETABLE] => 0 [29] => 2013-11-05 00:00:00 [LASTUPDATED] => 2013-11-05 00:00:00 [30] => 2013-11-05 00:00:00 [CREATED] => 2013-11-05 00:00:00 )
Imagine Crafts
LearnMakeCommunityShop

Give Thanks Greeting Card with StazOn Studio Glaze

We are just sailing through this month and Thanksgiving is almost here. Maybe you have friends or family that can’t be at your table this year and you want to send them a little something. This happy card is easy to make and sure to put a smile on a loved ones face.


Give Thanks Greeting Card with StazOn Studio Glaze

Directions:

1.  Make a base card from White cardstock trimmed 4.25 x 11 inches and folded in half.

2015_PW_studioglaze_Step1

2.  Cut watercolor paper 4 x 5.50 inches. Spritz with water and dab on Studio Glaze Blue Hawaii. Move the glaze around with a wet paintbrush until you are happy. Let dry or heat with a heat gun.

NOTE: Only watercolor about 2/3 of the paper as the bottom will be covered in another step.

2015_PW_studioglaze_Step2

3.  Spritz watercolor paper with water and dab on Studio Glaze Midnight Blue. Move glaze around with wet paintbrush. Let dry.

2015_PW_studioglaze_Step3

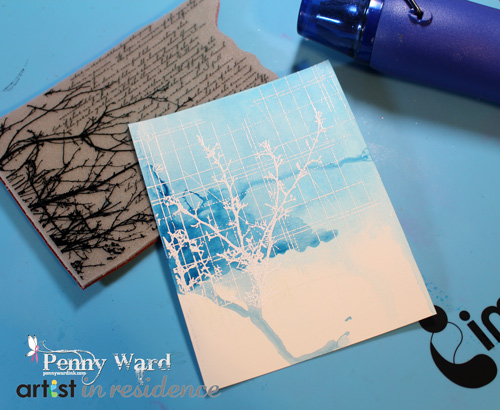
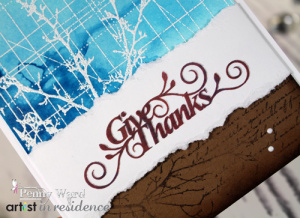
4.  Stamp image with VersaMark ink, heat emboss with White powder. Ink upper left corner of this panel with Memento Rich Cocoa.

2015_PW_studioglaze_Step4

5.  Cut a 2 x 4 inch piece of Kraft cardstock. Stamp image with Memento Rich Cocoa. Ink around the edges with Memento Toffee Crunch and Memento Espresso Truffle. Adhere to bottom of watercolor paper.

6.  With computer and printer, print sentiment, tear edges and wrap around watercolor panel.

2015_PW_studioglaze_sneak

7.  Adhere watercolor panel to base card with favorite glue. Embellish card front with irRESISTible Pico Wedding Dress dots.

by Penny Ward

Difficulty

Beginner - Intermediate

Time

1/2 hour + dry time

Materials Needed

Imagine Crafts featuring Tsukineko:

Other

  • Memory Box:  Skywriting & Sketch Journal stamps
  • Silhouette Cameo & File Design #22380
  • Miscellaneous:  Watercolor paper, White & Kraft cardstocks, paintbrush, water, heat gun, computer, printer, adhesive


Sign up for our newsletter
Facebook Pinterest Twitter YouTube Vimeo