Array ( [0] => 280 [ID] => 280 [1] => 1 [TYPEID] => 1 [2] => 0 [SECTIONID] => 0 [3] => project-details [MOD_NAME] => project-details [4] => [TITLE] => [5] => Project Details [META_TITLE] => Kaleidacolor for a Beautiful Ombre Butterfly Wash [6] => [META_DESCRIPTION] => Kaleidacolor for a Beautiful Ombre Butterfly Wash [7] => [META_KEYWORDS] => [8] => [BUTTON_TITLE] => [9] => [BODY] => [10] => [BODY_SIDE] => [11] => [MODULE_PROCESSING] => [12] => [MODULE_META] => [13] => project-details-head.php [MODULE_HEAD] => project-details-head.php [14] => project-details-body.php [MODULE_BODY] => project-details-body.php [15] => [MODULE_SIDE] => [16] => 0 [TOP_ORDER] => 0 [17] => 0 [HITS_UNIQUE] => 0 [18] => 0 [HITS_REPEAT] => 0 [19] => 0 [ROBOT_HITS] => 0 [20] => 0000-00-00 00:00:00 [LASTVIEWED] => 0000-00-00 00:00:00 [21] => 0000-00-00 00:00:00 [ROBOT_LASTVIEWED] => 0000-00-00 00:00:00 [22] => 0.70 [PRIORITY] => 0.70 [23] => 1 [SITEMAP] => 1 [24] => 1 [ACTIVE] => 1 [25] => 1 [DISPLAY_TITLE] => 1 [26] => 0 [SSL_MODE] => 0 [27] => 0 [EDITABLE] => 0 [28] => 0 [DELETABLE] => 0 [29] => 2013-11-05 00:00:00 [LASTUPDATED] => 2013-11-05 00:00:00 [30] => 2013-11-05 00:00:00 [CREATED] => 2013-11-05 00:00:00 )
Imagine Crafts
LearnMakeCommunityShop

Kaleidacolor for a Beautiful Ombre Butterfly Wash

Bringing Ombre into this century can't be any easier - simply grab your Kaleidacolor ink pads. I remember getting my very first Kaleidacolor ink pad some 15 years ago - yes you heard me that long ago - its the same one used here today and I am as much in love today as then, but realized that I don't use them often enough though. I love the rainbow colors and the possibilities these ink pads offer. Lets explore...


Kaleidacolor for a Beautiful Ombre Butterfly Wash

1. Fold a card to measure 4 1/4" x 6". Cut a smooth white cardstock panel slightly smaller.
2015_September_JN_Kaleidacolor_Step2
2. Grab your Kaleidacolor ink pad in the choice of your color theme as well as a sponge dauber.
2015_September_JN_Kaleidacolor_Step1
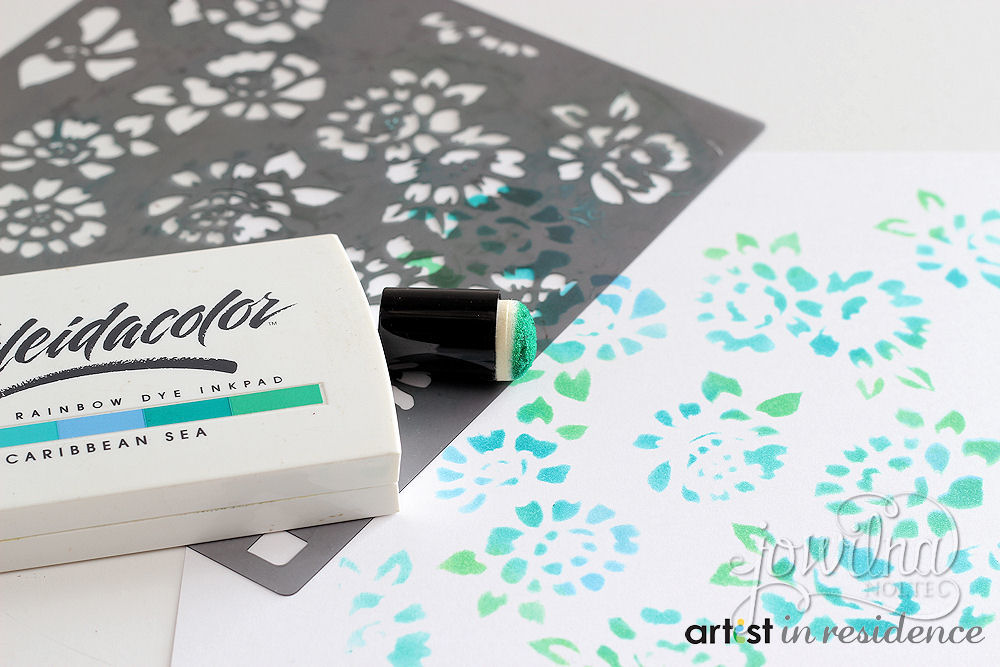
2. Use a stencil and your sponge dauber and stencil the design onto your panel using the sponge dauber. Use the same dauber on all the colors for a gorgeous Ombre effect blending the colors beautifully.
2015_September_JN_Kaleidacolor_Step3
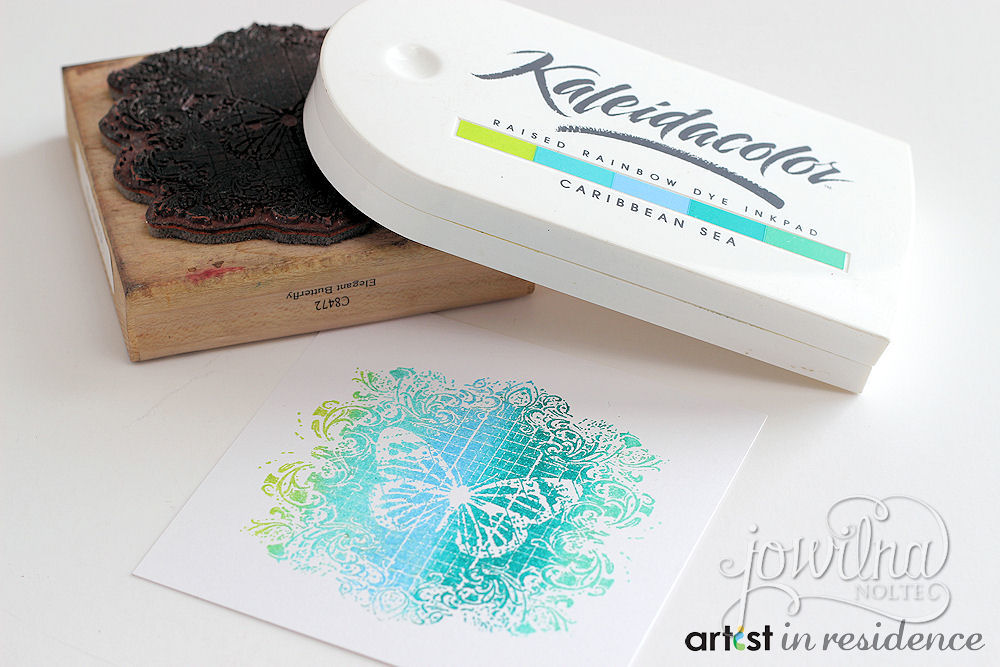
3. Ink a butterfly stamp using your ink pad. Remember to keep inking in the same place until you have a good coverage. Mist the stamp with water and stamp onto white cardstock. Heat set.
4. Punch stamped butterfly into a circle.
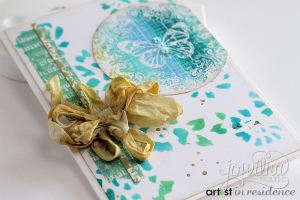
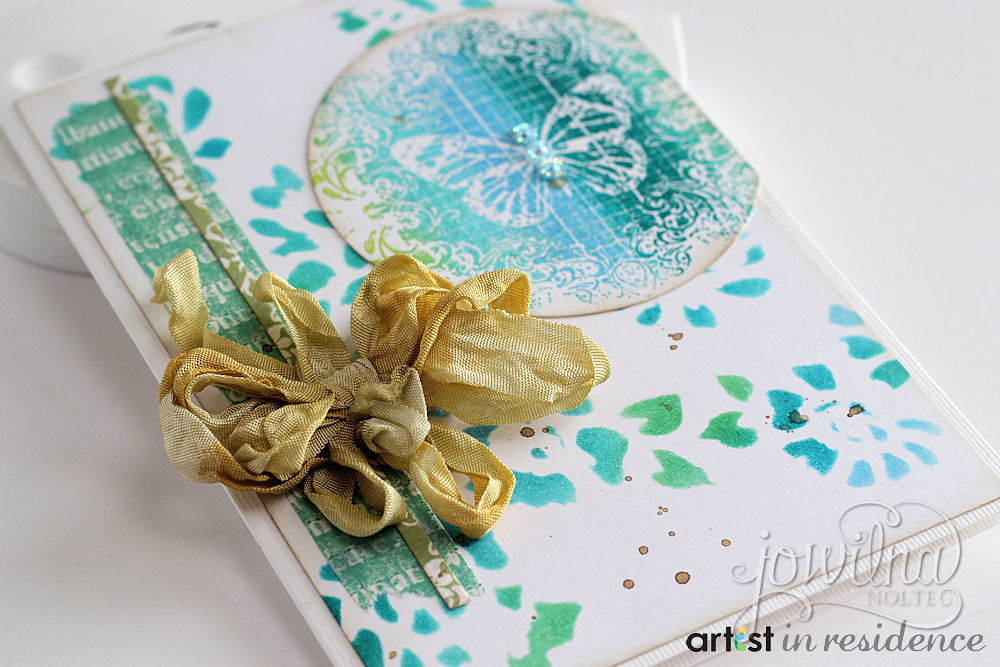
5. Adhere stenciled panel to base card.
6. Adhere butterfly circle to card and trim off overlapping piece.
7. Add washi tape strips and ribbon bow to finish off card.
8. Add diamante to butterfly.
detail 1

by Jowilna Nolte

Difficulty

Beginner - Intermediate

Time

1/2 hour + dry time

Materials Needed

Imagine Crafts featuring Tsukineko

Other:

  • Stamp;Stampington, white cardstock; Antalis, Ribbon; 7Gypsies, Washi tape; 7Gypsies, Stencil; Prima, Diamante


Sign up for our newsletter
Facebook Pinterest Twitter YouTube Vimeo