Array ( [0] => 280 [ID] => 280 [1] => 1 [TYPEID] => 1 [2] => 0 [SECTIONID] => 0 [3] => project-details [MOD_NAME] => project-details [4] => [TITLE] => [5] => Project Details [META_TITLE] => Girl Power Pink Card [6] => [META_DESCRIPTION] => Girl Power Pink Card [7] => [META_KEYWORDS] => [8] => [BUTTON_TITLE] => [9] => [BODY] => [10] => [BODY_SIDE] => [11] => [MODULE_PROCESSING] => [12] => [MODULE_META] => [13] => project-details-head.php [MODULE_HEAD] => project-details-head.php [14] => project-details-body.php [MODULE_BODY] => project-details-body.php [15] => [MODULE_SIDE] => [16] => 0 [TOP_ORDER] => 0 [17] => 0 [HITS_UNIQUE] => 0 [18] => 0 [HITS_REPEAT] => 0 [19] => 0 [ROBOT_HITS] => 0 [20] => 0000-00-00 00:00:00 [LASTVIEWED] => 0000-00-00 00:00:00 [21] => 0000-00-00 00:00:00 [ROBOT_LASTVIEWED] => 0000-00-00 00:00:00 [22] => 0.70 [PRIORITY] => 0.70 [23] => 1 [SITEMAP] => 1 [24] => 1 [ACTIVE] => 1 [25] => 1 [DISPLAY_TITLE] => 1 [26] => 0 [SSL_MODE] => 0 [27] => 0 [EDITABLE] => 0 [28] => 0 [DELETABLE] => 0 [29] => 2013-11-05 00:00:00 [LASTUPDATED] => 2013-11-05 00:00:00 [30] => 2013-11-05 00:00:00 [CREATED] => 2013-11-05 00:00:00 )
Imagine Crafts
LearnMakeCommunityShop

Learn How to Make a #GirlPower Card

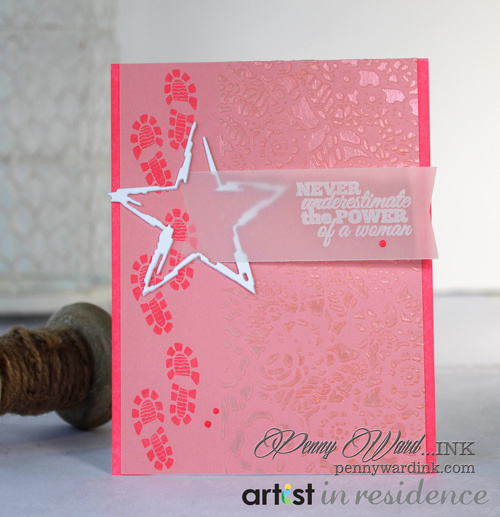
I love this sentiment paired with boot steps and a doily stencil. Tough and soft at the same time. Who in your life could use a card like this? Your mom, sister, friend, coworker? I will be sending this one to a friend that just got a promotion at work…she will love it!


Girl Power Pink Card

Directions:

2015_PW_artist_girlpower_step1

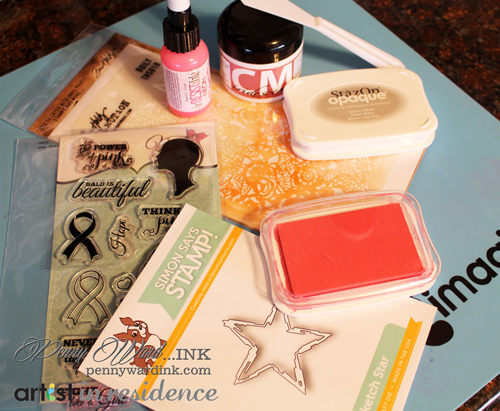
1.  Gather your supplies and let’s get started.

2015_PW_artist_girlpower_step2

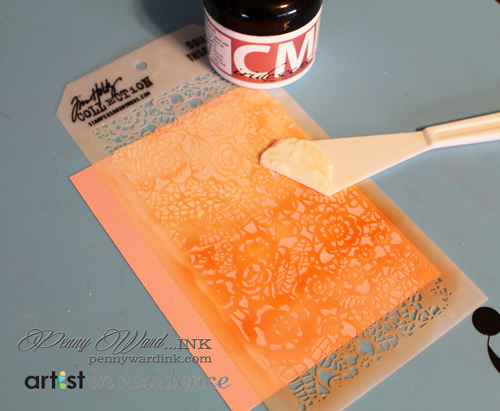
2.  On pink cardstock trimmed to 4 x 5.50 inches, place your stencil and start adding Creative Medium Pink with a palette knife. Let dry.

TIP: I spray the back of my stencil with EasyTack as it holds down the stencil to the cardstock and the craft mat.

3.  Stamp boot images with Radiant Neon Coral ink along the left edge. Adhere this panel to a card base formed from White cardstock cut at 4.25 x 11 inches, folded in half and inked on the long edges with Radiant Coral.

4.  Die cut star from White cardstock two times. Stack and adhere together. Attach to card front.

2015_PW_artist_girlpower_step3

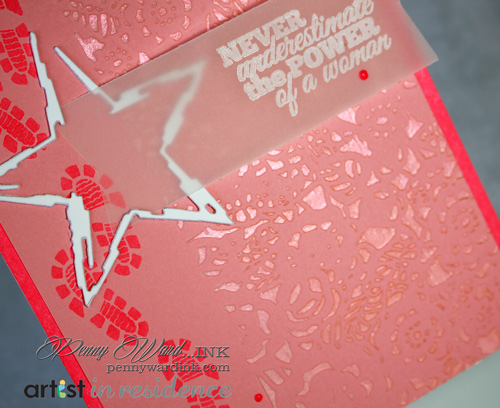
5.  Stamp sentiment using StazOn Cotton White onto vellum. Trim and notch ends, then slip through and under star embellishment.

6.  Add irRESISTible Pico Neon Coral as shown.

by Penny Ward

Difficulty

Beginner - Intermediate

Time

1/2 hour + dry time

Materials Needed

Imagine Crafts featuring Tsukineko:  

Other

  • Verve:  Pink Power stamp set
  • Simon Says Stamp:  Sketch Star die
  • Craftwell:  eBosser
  • Miscellaneous:  White cardstock, Vellum, Favorite adhesive


Sign up for our newsletter
Facebook Pinterest Twitter YouTube Vimeo