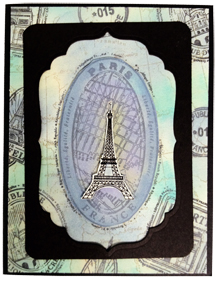
make / by product / fantastix / paris card
Paris Card
Evoke the feelings of the the City of Light in your next card project.

-
Download and print digital background stamp “Old Map” onto cream cardstock in a light colored printer ink.
-
Stamp the oval shaped Paris map (largest stamp from the set) with VersaFine Onyx Black in the middle of the map background.
-
Without overlapping images, randomly stamp remaining images in Onyx Black around the Paris map.
-
Using Jumbo Daubers, begin coloring and blending the background (working from lighter to darker colors) with VersaMagic inks; Magnolia Bud, Aegean Blue and Turquoise Gem. Trim, if needed and adhere to front of black note card.
-
Stamp Paris Map twice on cream cardstock and emboss one of the images with clear embossing powder; set it aside.
-
With remaining Paris Map (non-embossed), trim around the outside to remove outermost oval and words. Color with inks and daubers used in Step 4, adding Pretty Petunia and Mango Madness for highlights. Adhere to card front with foam mounting tape, centering over the same stamped image.
-
Using the embossed image, highlight the ‘sky’ through the center of the Eiffel Tower with Agean Blue and the Fantastix. Cut out the Eiffel Tower and adhere with foam tape.
-
Die cut Top Note frame die out of black cardstock. (Reserve center portion for future use on another project.) Trim around outside of frame as desired to become the “frame” for the inner stamped medallion; round corners if desired. Apply adhesive and mount on card front to create a frame.
-
TIP: Consider using any off-cut from the “Old Map” background as an accent/decorative strip inside the card!
