Array ( [0] => 280 [ID] => 280 [1] => 1 [TYPEID] => 1 [2] => 0 [SECTIONID] => 0 [3] => project-details [MOD_NAME] => project-details [4] => [TITLE] => [5] => Project Details [META_TITLE] => Radiant Neon to Make a Tacky Tourist Signage Card [6] => [META_DESCRIPTION] => Radiant Neon to Make a Tacky Tourist Signage Card [7] => [META_KEYWORDS] => [8] => [BUTTON_TITLE] => [9] => [BODY] => [10] => [BODY_SIDE] => [11] => [MODULE_PROCESSING] => [12] => [MODULE_META] => [13] => project-details-head.php [MODULE_HEAD] => project-details-head.php [14] => project-details-body.php [MODULE_BODY] => project-details-body.php [15] => [MODULE_SIDE] => [16] => 0 [TOP_ORDER] => 0 [17] => 0 [HITS_UNIQUE] => 0 [18] => 0 [HITS_REPEAT] => 0 [19] => 0 [ROBOT_HITS] => 0 [20] => 0000-00-00 00:00:00 [LASTVIEWED] => 0000-00-00 00:00:00 [21] => 0000-00-00 00:00:00 [ROBOT_LASTVIEWED] => 0000-00-00 00:00:00 [22] => 0.70 [PRIORITY] => 0.70 [23] => 1 [SITEMAP] => 1 [24] => 1 [ACTIVE] => 1 [25] => 1 [DISPLAY_TITLE] => 1 [26] => 0 [SSL_MODE] => 0 [27] => 0 [EDITABLE] => 0 [28] => 0 [DELETABLE] => 0 [29] => 2013-11-05 00:00:00 [LASTUPDATED] => 2013-11-05 00:00:00 [30] => 2013-11-05 00:00:00 [CREATED] => 2013-11-05 00:00:00 )
Imagine Crafts
LearnMakeCommunityShop

Radiant Neon to Make a Tacky Tourist Signage Card

We don’t have a name for “Tacky Tourists” in Germany. But it’s a really good and funny description for these kind of travelers and I think, we should have a German word for them. For this card I created a new road sign. A couple of years ago, my BFF Dagmar and I visited the Gizeh Pyramides at Kairo, Agypt. 


Radiant Neon to Make a Tacky Tourist Signage Card

Directions:

2015_july_HL_tackytourist_instructions_step1

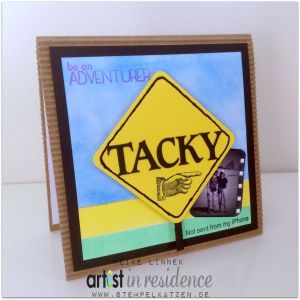
1. Cut out a 3”x3” inch piece of yellow cardstock square and round the edges with a corner chomper. Draw a fine line with irresistible Pico Embellisher Tuxedo Black.

2015_july_HL_tackytourist_instructions_step1

2. Die cut the letters and glue them onto the cardstock. Fussy cut a small stripe of black cardstock, glue it under the sign to create a pylon.

2015_july_HL_tackytourist_instructions_step3

3. Cut out a 5” x 5” inch piece of white cardstock. Mask about ¾ of it with masking tape and sponge the area with Electric Blue from Radiant Neon 4 Cool ink pads.

2015_july_HL_tackytourist_instructions_step4

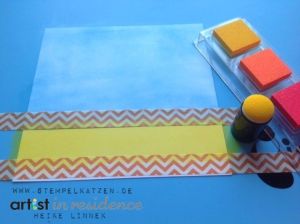
4. Tape the next and smaller section and sponge it with Electric Yellow from Radiant Neon 4 Warm ink pads.

2015_july_HL_tackytourist_instructions_step5

5. Mask the last and smallest section and sponge it in Electric Green.

2015_july_HL_tackytourist_instructions_step6

6. Sponge the stamp in different Neon Colors and stamp immediately onto the cardstock.

2015_july_HL_tackytourist_instructions_step7

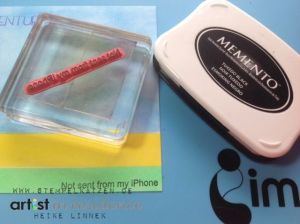
7. Stamp the other stamps with Memento Ink Pad in Tuxedo Black.

2015_july_HL_tackytourist_instructions_step9

8. Cut a 12” x 6” inch base card from corrugated cardboard and fold it in half. Cut a 5 ½” x 5 ½” inch mat from black cardstock and adhere the layers.

by Heike Linnek

Difficulty

Beginner

Time

1/2 hour + dry time

Materials Needed

Imagine Crafts feat. Tsukineko:

Other:

  • Spellbinders Shapeabilities Font One Uppercase
  • Viva Las Vegas Stamps “Not sent from my iPhone”, Plate #1441; “Road Trip”, “Be an Adventurer Plate #927
  • We R Memory Keepers Corner Chomper
  • Big Shot
  • Miscellaneous: cardstock: white, black, yellow; corrugated cardboard; photo; acrylic block; dimensional Foams; glue of choice; masking tape


Sign up for our newsletter
Facebook Pinterest Twitter YouTube Vimeo