Array ( [0] => 280 [ID] => 280 [1] => 1 [TYPEID] => 1 [2] => 0 [SECTIONID] => 0 [3] => project-details [MOD_NAME] => project-details [4] => [TITLE] => [5] => Project Details [META_TITLE] => Glitzy Wedding Favors Using Delicata Ink [6] => [META_DESCRIPTION] => Glitzy Wedding Favors Using Delicata Ink [7] => [META_KEYWORDS] => [8] => [BUTTON_TITLE] => [9] => [BODY] => [10] => [BODY_SIDE] => [11] => [MODULE_PROCESSING] => [12] => [MODULE_META] => [13] => project-details-head.php [MODULE_HEAD] => project-details-head.php [14] => project-details-body.php [MODULE_BODY] => project-details-body.php [15] => [MODULE_SIDE] => [16] => 0 [TOP_ORDER] => 0 [17] => 0 [HITS_UNIQUE] => 0 [18] => 0 [HITS_REPEAT] => 0 [19] => 0 [ROBOT_HITS] => 0 [20] => 0000-00-00 00:00:00 [LASTVIEWED] => 0000-00-00 00:00:00 [21] => 0000-00-00 00:00:00 [ROBOT_LASTVIEWED] => 0000-00-00 00:00:00 [22] => 0.70 [PRIORITY] => 0.70 [23] => 1 [SITEMAP] => 1 [24] => 1 [ACTIVE] => 1 [25] => 1 [DISPLAY_TITLE] => 1 [26] => 0 [SSL_MODE] => 0 [27] => 0 [EDITABLE] => 0 [28] => 0 [DELETABLE] => 0 [29] => 2013-11-05 00:00:00 [LASTUPDATED] => 2013-11-05 00:00:00 [30] => 2013-11-05 00:00:00 [CREATED] => 2013-11-05 00:00:00 )
Imagine Crafts
LearnMakeCommunityShop

Glitzy Wedding Favors Using Delicata Ink

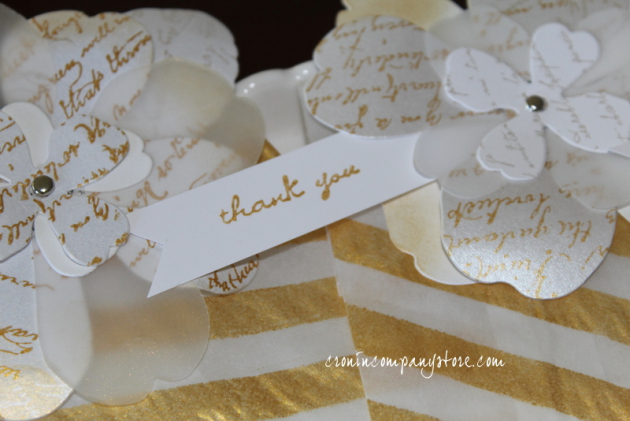
Can you picture one of these favors topping a place setting or perhaps lined up together on a tray next to the door so your wedding guests will see them as they leave? Favors are one of those things that are made even more exciting by the wrapping! This idea is designed for wedding favors and other occasions.


Glitzy Wedding Favors Using Delicata Ink

Directions:

2015_May_MC_Wedding_Step1

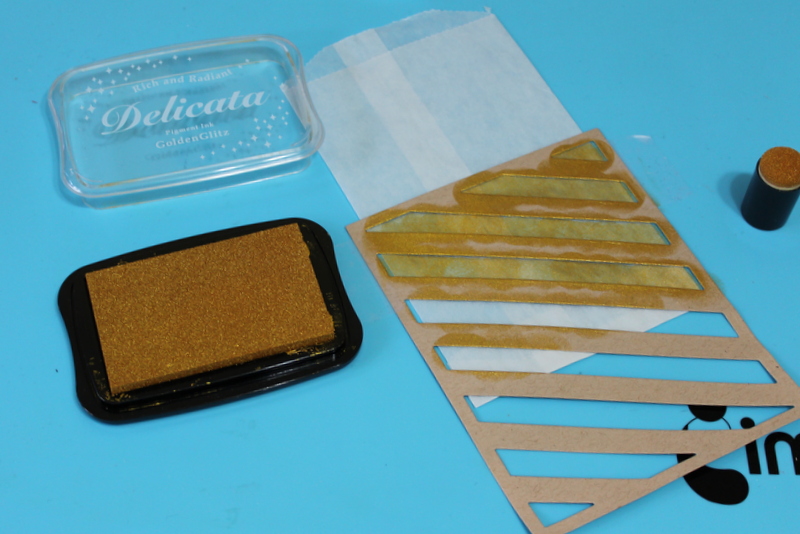
First lay your stencil over your favor bag. I find it easiest to secure the stencil to the craft mat with a bit of tape to keep it from moving. Using a sponge dauber, apply Delicata Golden Glitz to the bag, let dry completely.

2015_May_MC_Wedding_Step2

Once all of the bags are completed, set aside to dry. Since the top of the bag is going to be folded over, I only added the design to the lower half.

2015_May_MC_Wedding_Step3

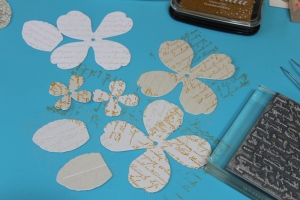
Cut a series of flowers either with a punch or die from various paper types. Using a script stamp, Delicata Golden Glitz and Brilliance Platinum Planet, randomly stamp the petals. Allow to dry completely before stacking.

2015_May_MC_Wedding_Step4

On a small strip of paper, stamp 'thank you' and cut a 'v' into the end. Stack the flowers starting with the largest first and vary the types of paper. Secure the flowers to each other with a brad or you can add a drop of glue between each layer. Slide the 'thank you' under one of the petals and secure with a drop of glue.

Big finish! Add the favor to the bag, fold over the top of the bag and poke a very small hole. Secure the flower to the bag with the brad - this also keeps the bag folded over. You can also close the bag with a piece of washi tape.

Enjoy!

by Maureen Cronin

Difficulty

Beginner

Time

1/2 hour + dry time

Materials Needed

IMAGINE Crafts featuring Tsukineko: 

Other

  • Stamps: Stampin' Up 'thank you; Stampendous script
  • Papertrey diagonal line die
  • Flower die
  • Various white and vellum paper
  • Miscellaneous: gift bags, brads, adhesive


Sign up for our newsletter
Facebook Pinterest Twitter YouTube Vimeo