Array ( [0] => 280 [ID] => 280 [1] => 1 [TYPEID] => 1 [2] => 0 [SECTIONID] => 0 [3] => project-details [MOD_NAME] => project-details [4] => [TITLE] => [5] => Project Details [META_TITLE] => Gift Card Organizer for a Recent Graduate [6] => [META_DESCRIPTION] => Gift Card Organizer for a Recent Graduate [7] => [META_KEYWORDS] => [8] => [BUTTON_TITLE] => [9] => [BODY] => [10] => [BODY_SIDE] => [11] => [MODULE_PROCESSING] => [12] => [MODULE_META] => [13] => project-details-head.php [MODULE_HEAD] => project-details-head.php [14] => project-details-body.php [MODULE_BODY] => project-details-body.php [15] => [MODULE_SIDE] => [16] => 0 [TOP_ORDER] => 0 [17] => 0 [HITS_UNIQUE] => 0 [18] => 0 [HITS_REPEAT] => 0 [19] => 0 [ROBOT_HITS] => 0 [20] => 0000-00-00 00:00:00 [LASTVIEWED] => 0000-00-00 00:00:00 [21] => 0000-00-00 00:00:00 [ROBOT_LASTVIEWED] => 0000-00-00 00:00:00 [22] => 0.70 [PRIORITY] => 0.70 [23] => 1 [SITEMAP] => 1 [24] => 1 [ACTIVE] => 1 [25] => 1 [DISPLAY_TITLE] => 1 [26] => 0 [SSL_MODE] => 0 [27] => 0 [EDITABLE] => 0 [28] => 0 [DELETABLE] => 0 [29] => 2013-11-05 00:00:00 [LASTUPDATED] => 2013-11-05 00:00:00 [30] => 2013-11-05 00:00:00 [CREATED] => 2013-11-05 00:00:00 )
Imagine Crafts
LearnMakeCommunityShop

Gift Card Organizer for a Recent Graduate

Graduations are just around the corner and these young people are going to be getting a lot of gift cards. Now they need a place to keep them organized. Aren't you glad you stopped by today so I can help solve that problem with this one of a kind Gift Card Organizer?!?


Gift Card Organizer for a Recent Graduate

Directions:

2015_PW_May_Giftcard_step1

1.  Cut gift card pieces with Silhouette Cameo.

2015_PW_May_Giftcard_step2

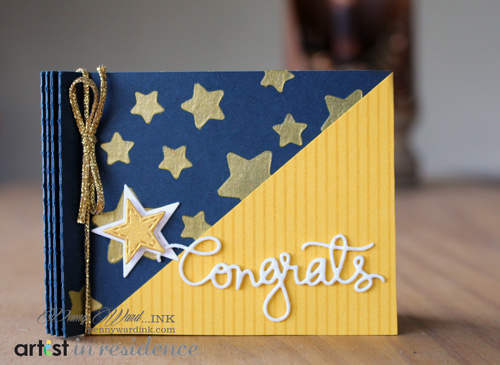
2. Mask off front cover and stencil with a palette knife and Creative Medium Gold. Let dry. Stamp a good size scrap of Yellow cardstock with Pinstripe stamp and Delicata Golden glitz. Trim into an angle so it covers the lower right half of the gift card front.

2015_PW_May_Giftcard_step3

3. Stamp each of the Yellow inserts with Delicata Golden Glitz, let dry.

2015_PW_May_Giftcard_step5  2015_PW_May_Giftcard_step6

4. Assemble Gift card as shown using Scor-Tape.

HINT: Using eight pieces of Scor-Tape, remove backing from two, position Yellow insert and squeeze tightly. Do this 3 more times to make your Gift Card Organizer. In other words...don't remove all the tape backing at the same time.

2015_PW_May_Giftcard_step4

5. Die cut two stars (one medium, one small). Ink the smallest star with Vegas Gold All Purpose Ink and an Inkblusher. Let dry.

2015_PW_May_Giftcard_sneak

6. Die cut Sentiment from fun foam, coat with irRESISTible Pico Wedding Dress, let dry. Assemble card adhering stars, sentiment and tying a bow with gold cord.

2015_PW_May_Giftcard_inside

View on inside.  :)

by Penny Ward

Difficulty

Intermediate

Time

1 hour + dry time

Materials Needed

Imagine Crafts featuring Tsukineko:  

Other

  • My Favorite Things:  Pinstripe Background stamp
  • Simon Says Stamp: Cake & Congrats die
  • Lil Inkers:  Stitched Stars
  • Craftwell:  eBosser
  • Silhouette Cameo & Silhouette Design #52084
  • Krenick: Metallic Gold Braid
  • Miscellaneous:  Yellow, Navy & White cardstock, White Fun Foam, Favorite glue


Sign up for our newsletter
Facebook Pinterest Twitter YouTube Vimeo