Array ( [0] => 280 [ID] => 280 [1] => 1 [TYPEID] => 1 [2] => 0 [SECTIONID] => 0 [3] => project-details [MOD_NAME] => project-details [4] => [TITLE] => [5] => Project Details [META_TITLE] => Memento Luxe to Create a Ribbon Gift Envelope [6] => [META_DESCRIPTION] => Memento Luxe to Create a Ribbon Gift Envelope [7] => [META_KEYWORDS] => [8] => [BUTTON_TITLE] => [9] => [BODY] => [10] => [BODY_SIDE] => [11] => [MODULE_PROCESSING] => [12] => [MODULE_META] => [13] => project-details-head.php [MODULE_HEAD] => project-details-head.php [14] => project-details-body.php [MODULE_BODY] => project-details-body.php [15] => [MODULE_SIDE] => [16] => 0 [TOP_ORDER] => 0 [17] => 0 [HITS_UNIQUE] => 0 [18] => 0 [HITS_REPEAT] => 0 [19] => 0 [ROBOT_HITS] => 0 [20] => 0000-00-00 00:00:00 [LASTVIEWED] => 0000-00-00 00:00:00 [21] => 0000-00-00 00:00:00 [ROBOT_LASTVIEWED] => 0000-00-00 00:00:00 [22] => 0.70 [PRIORITY] => 0.70 [23] => 1 [SITEMAP] => 1 [24] => 1 [ACTIVE] => 1 [25] => 1 [DISPLAY_TITLE] => 1 [26] => 0 [SSL_MODE] => 0 [27] => 0 [EDITABLE] => 0 [28] => 0 [DELETABLE] => 0 [29] => 2013-11-05 00:00:00 [LASTUPDATED] => 2013-11-05 00:00:00 [30] => 2013-11-05 00:00:00 [CREATED] => 2013-11-05 00:00:00 )
Imagine Crafts
LearnMakeCommunityShop

Memento Luxe to Create a Ribbon Gift Envelope

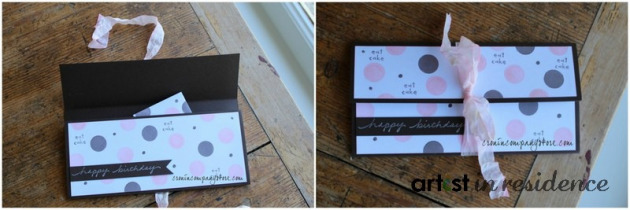
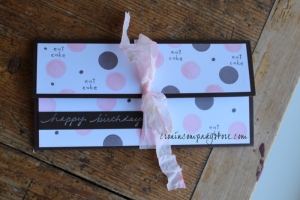
Gift cards, money or homemade coupons, this is a great way to give them to your special person. It also doubles as a cute storage envelope for all of their monetary gifts. This is fun to make and easy to change the gift theme.


Memento Luxe to Create a Ribbon Gift Envelope

The Set Up:

  • Cut 1x brown cardstock 7" x 8"
    • score/fold along the long side at the 3" mark and the 6.5" mark.

score marks

  • Cut 1x white cardstock 6.75" x 7.75"
    • before of after stamping cut the white cardstock into 1x each 6.75" x 3.25", 6.75" x 1.75" and 6.75" x 2.75"
  • Cut 2x white cardstock 1" x 2.75"

2015_MC_May_Money_Step1

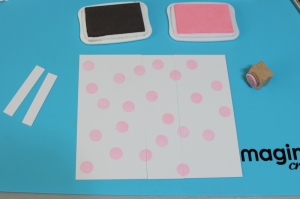
Using Memento Luxe Angel Pink, stamp circles randomly on cardstock.

2015_MC_May_Money_Step2

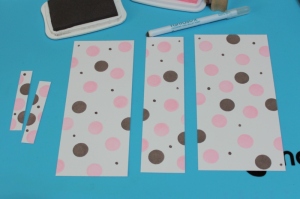
Add Memento Luxe Rich Cocoa circles as well as randomly add small dots with a fantastix. Don't forget to stamp the small pieces too. When I first made this I only decided at the end, once assembled, to stamp 'eat cake' but adding it now would be much easier.

2015_MC_May_Money_Step3

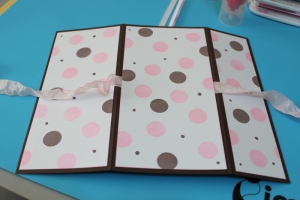
Adhere stamped rectangles to corresponding areas on brown cardstock. When adding the back piece, adhere a 25" (or longer) piece of ribbon under the rectangle as shown.

2015_MC_May_Money_Step4

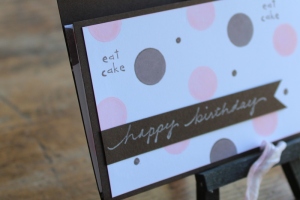
On a 4" x .5" piece of brown paper, stamp 'happy birthday' using Memento Luxe Wedding Dress. Trim edge into a 'v' and adhere to card.

Accordion fold the 2 white 1" x 3" pieces first in half and then fold in 1/2 again. Carefully adhere the ends to the inside of the envelope as shown. Take your time on this step, I found it easiest to adhere one side, let it dry and then adhere the other.

IMG_4989-001

If you'd like you can add a matching card inside along with the gift.

by Maureen Cronin

Difficulty

Intermediate

Time

45 min + dry time

Materials Needed

Imagine Crafts featuring Tsukineko

Other

  • Stamps: Stampin' Up 'circle' & 'eat cake', Rubber Soul 'Happy Birthday'
  • Miscellaneous: White and brown cardstock; adhesive, ribbon, paper cutter, score tool


Sign up for our newsletter
Facebook Pinterest Twitter YouTube Vimeo