Array ( [0] => 280 [ID] => 280 [1] => 1 [TYPEID] => 1 [2] => 0 [SECTIONID] => 0 [3] => project-details [MOD_NAME] => project-details [4] => [TITLE] => [5] => Project Details [META_TITLE] => Brilliance Ink to Make a Pink Thank You Card [6] => [META_DESCRIPTION] => Brilliance Ink to Make a Pink Thank You Card [7] => [META_KEYWORDS] => [8] => [BUTTON_TITLE] => [9] => [BODY] => [10] => [BODY_SIDE] => [11] => [MODULE_PROCESSING] => [12] => [MODULE_META] => [13] => project-details-head.php [MODULE_HEAD] => project-details-head.php [14] => project-details-body.php [MODULE_BODY] => project-details-body.php [15] => [MODULE_SIDE] => [16] => 0 [TOP_ORDER] => 0 [17] => 0 [HITS_UNIQUE] => 0 [18] => 0 [HITS_REPEAT] => 0 [19] => 0 [ROBOT_HITS] => 0 [20] => 0000-00-00 00:00:00 [LASTVIEWED] => 0000-00-00 00:00:00 [21] => 0000-00-00 00:00:00 [ROBOT_LASTVIEWED] => 0000-00-00 00:00:00 [22] => 0.70 [PRIORITY] => 0.70 [23] => 1 [SITEMAP] => 1 [24] => 1 [ACTIVE] => 1 [25] => 1 [DISPLAY_TITLE] => 1 [26] => 0 [SSL_MODE] => 0 [27] => 0 [EDITABLE] => 0 [28] => 0 [DELETABLE] => 0 [29] => 2013-11-05 00:00:00 [LASTUPDATED] => 2013-11-05 00:00:00 [30] => 2013-11-05 00:00:00 [CREATED] => 2013-11-05 00:00:00 )
Imagine Crafts
LearnMakeCommunityShop

Brilliance Ink to Make a Pink Thank You Card

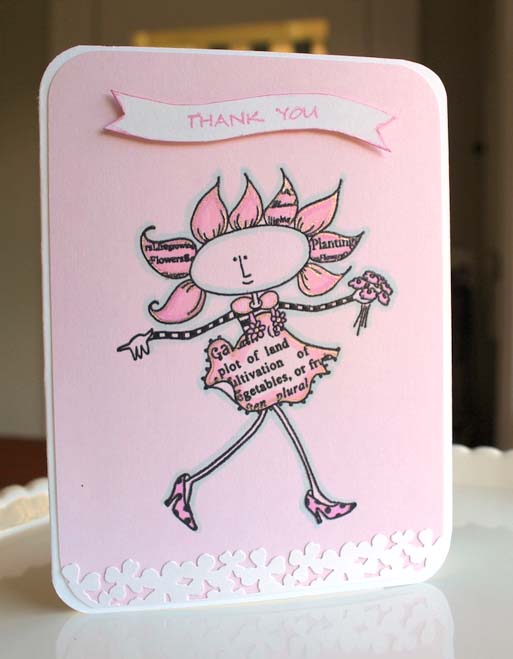
A whimsical stamp from Stampotique stars in this thank you card.


Brilliance Ink to Make a Pink Thank You Card
  1. Stamp the image on cardstock with VersaFine Archival Pigment Ink in Onyx Black, then emboss with Embossing Powder in Clear. Color in the petals, dress and flowers with a combination of the Spectrum Noir pens, starting with the lighter colors and running the darker pinks along the edges.
     
  2. Outline the petals and dress inside the image with metallic gelly roll pen, then outline the entire image with Copic Cool Shadow.
     
  3. Punch a piece of scrap paper with the flower edge punch and adhered to the lower edge.
     
  4. Stamp “THANK YOU” in Brilliance Pigment Ink in Pearlescent Orchid on a hand-cut flag, edge the flag with rose bud and adhere with dimensional tape.
by Maureen Cronin

Difficulty

Beginner

Time

1-2 Hours

Materials Needed

From IMAGINE Crafts/Tsukineko:

  • VersaFine Archival Pigment Ink in Onyx Black
  • Embossing Powder in Clear
  • Brilliance Pigment Ink in Pearlescent Orchid

Miscellaneous:

  • Stampotique Waltzing Fleur
  • Spectrum Noir Alcohol Markers PP3, PL1
  • “THANK YOU” stamp from Savvy Stamps
  • Copic Marker BG10 Cool Shadow 
  • Martha Stewart Flower Border punch
  • Gelly Roll metallic pen in bronze
  • cardstock

Download project sheet


Sign up for our newsletter
Facebook Pinterest Twitter YouTube Vimeo