make / by project type / memento ink to make a decorative tag
Memento Ink to Make a Decorative Tag
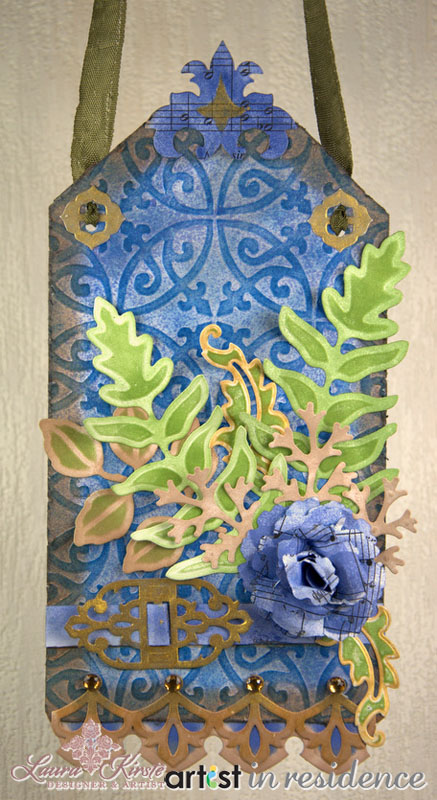
Transform plain white cardstock into a colorful hanging tag with embossing and inks.
Prepare Tag
-
Using Finger Dauber, pounce Gray Flannel randomly on full sheet of white card stock.
-
Lightly spritz entire inked paper with Fireworks Paris Dusk. Let dry (or dry with hair dryer or heat gun). This adds a beautiful sparkling sheen of blue color! Cut the sheet in half to make two tags (front and back).
-
With side “A” M-Bossabilities Ornamental Iron folder, emboss one inked paper (be sure raised design is on blue side). Emboss other inked paper the same, but using side “B” embossing folder.
-
On both embossed papers, use Finger Dauber to lightly rub Danube Blue ink in a circular motion over top of raised embossed design. Notice how the Fireworks still shines through this layer of ink, lovely effect!
-
Cut each embossed inked paper into 4” X 7” tag with 1 ½” cut off the top corners.
-
Using Finger Dauber and Toffee Crunch ink, distress around perimeter of both tags. Heavily distress edges of tags by rubbing a scissor blade across edge creating a frayed edge. This process will expose the white of the paper. Cover up white edges by inking with Gray Flannel and a Finger Dauber. Also add a little to the back of each tag along the edge so that no white shows when they are glued together.
Prepare Embellishments
-
(Die cut/emboss and ink all embellishments as shown, including ribbon buckles. Fleur de Lis and Blossom Spiral are cut from sheet music, all other from card stock. Specific instructions below.)
-
When cutting/embossing border from card stock, keep both positive and negative shapes as shown. Trim one of each to fit bottom of front tag (2 total – none for back tag). Ink positive border with Toffee Crunch then Gray Flannel on the tops as shown. Add a little shimmer by inking over the gray portion of the tips with Delicata Golden Glitz. Trick: Adding Golden Glitz over Gray Flannel creates an antique metal look.
-
Using die template as a stencil, ink negative border with Paris Dusk and decorative perimeter with Toffee Crunch. Glue 1 positive inked border to front and 1 negative inked border to back at bottom edge of tag front (tag front = embossed with side “A”).
-
From music sheet die cut/emboss 1 Fleur de Lis from Damask Accents die template and 1 Blossom Spiral One. Ink both with Finger Dauber and Paris Dusk. Blossom looks best with irregular blotchy coloring, as shown. Curl each petal of blossom around paintbrush handle then roll and glue into blooming flower. Using die template as stencil and Fantastix, brush Golden Glitz ink on center emblem of Fleur de Lis.
-
Ink 1 Damask Accents large ribbon buckle and 2 small ribbon buckles with Gray Flannel and then Golden Glitz. Trick: This layering process creates an antique metal look. For ribbon cut a strip of paper ½” X 5”, ink with Paris Dusk and thread through large buckle.
-
Using Bamboo Leaves ink, Finger Dauber and die template as stencil, color embossed portions of leaves. Then ink white fern edges with Bamboo Leaves. Color stemmed leaves and branches all over with Toffee Crunch ink. Using Fantastix add Golden Glitz to white edges of curled leaves.
Assemble Tag
-
Glue large ribbon-laced buckle to tag front, wrapping excess around back of tag. Tip: Pull up slightly on ribbon in center of buckle. This makes the paper ribbon appear more like fabric. Glue tag back to tag front, sealing all edges together. Slightly bend tips of leaves on stemmed leaves and glue to tag as shown.
-
Slightly bend tips of leaves on ferns and glue to tag as shown.
-
Slightly bend tips of leaves on curled leaves and glue to tag as shown.
-
Slightly bend tips of branches and glue to tag as shown.
-
Glue blossom flower to tag as shown.
-
Glue Fleur de Lis to tag as shown.
-
Glue small ribbon buckles to tag as shown. Using hole punch, (and avoiding the center bar of the buckle), punch twice for each buckle through all layers. Thread hanging ribbon (Vintage seam binding shown) through top hole from back to front then thread through bottom hole from front to back. Tie knot to itself in back of tag (don’t tie both ends of ribbon together).
-
Glue rhinestones to the tips of border as shown.