Array ( [0] => 280 [ID] => 280 [1] => 1 [TYPEID] => 1 [2] => 0 [SECTIONID] => 0 [3] => project-details [MOD_NAME] => project-details [4] => [TITLE] => [5] => Project Details [META_TITLE] => Conversation Hearts Valentine's Day Card [6] => [META_DESCRIPTION] => Conversation Hearts Valentine's Day Card [7] => [META_KEYWORDS] => [8] => [BUTTON_TITLE] => [9] => [BODY] => [10] => [BODY_SIDE] => [11] => [MODULE_PROCESSING] => [12] => [MODULE_META] => [13] => project-details-head.php [MODULE_HEAD] => project-details-head.php [14] => project-details-body.php [MODULE_BODY] => project-details-body.php [15] => [MODULE_SIDE] => [16] => 0 [TOP_ORDER] => 0 [17] => 0 [HITS_UNIQUE] => 0 [18] => 0 [HITS_REPEAT] => 0 [19] => 0 [ROBOT_HITS] => 0 [20] => 0000-00-00 00:00:00 [LASTVIEWED] => 0000-00-00 00:00:00 [21] => 0000-00-00 00:00:00 [ROBOT_LASTVIEWED] => 0000-00-00 00:00:00 [22] => 0.70 [PRIORITY] => 0.70 [23] => 1 [SITEMAP] => 1 [24] => 1 [ACTIVE] => 1 [25] => 1 [DISPLAY_TITLE] => 1 [26] => 0 [SSL_MODE] => 0 [27] => 0 [EDITABLE] => 0 [28] => 0 [DELETABLE] => 0 [29] => 2013-11-05 00:00:00 [LASTUPDATED] => 2013-11-05 00:00:00 [30] => 2013-11-05 00:00:00 [CREATED] => 2013-11-05 00:00:00 )
Imagine Crafts
LearnMakeCommunityShop

Conversation Hearts Valentine's Day Card

Take a bright twist on this Valentine's card with Radiant Neon inks.
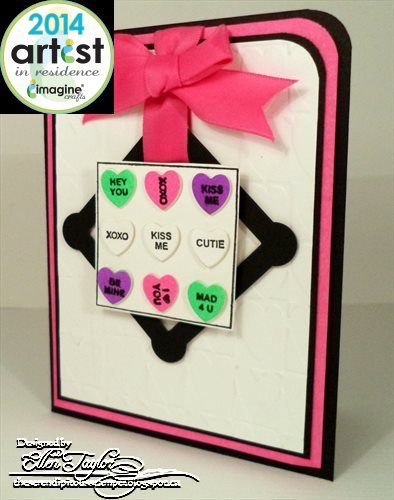

Conversation Hearts Valentine's Day Card
  1. Drag Radiant Neon Electric Pink, Electric Purple and Electric Green directly over 3 separate pieces of white card stock. Let dry.
     
  2. Using Versafine Onyx Black, Stamp Conversation Hearts using VersaFine Onyx Black onto the Electric Pink, Electric Green, and Electric Purple pieces of cardstock plus onto a white piece of cardstock.
     
  3. Heat emboss with Clear Embossing Powder.
     
  4. Die cut hearts using the Conversation Heart Block die.
     
  5. Cut the white layering piece block.
     
  6. Adhere 3 white, 2 Electric Green, 2 Electric Purple and 2 Electric Pink Conversation Hearts onto the Heart Block.
     
  7. Create card base from black cardstock with finished dimensions of 4-1/4˝ x 5-1/2˝.
     
  8. Cut layering pieces of the following: white cardstock to 4˝x 5¼˝ (edge with Electric Pink);  black cardstock 3-3/4˝ x 5˝; white cardstock 3-1/2˝ x 4-3/4˝.
     
  9. Round the top right corner of all the layering pieces.
     
  10. Emboss the smallest white layering piece using the patterned embossing folder.
     
  11. To create matching ribbon, ink a Sponge Dauber with Electric Pink and color the satin ribbon on both sides; allow to dry completely.
     
  12. Die cut the decorative Square Shaker Frame piece from black cardstock
     
  13. Loop the Electric Pink colored ribbon through it and adhere the ribbon to the back of the cardstock.  Finish with a bow.
     
  14. Adhere pieces as shown.
by Ellen Taylor

Difficulty

Intermediate

Time

1/2 hour to 45 minutes

Materials Needed

From IMAGINE Crafts/Tsukineko:

  • Radiant Neon: Electric Pink, Electric Purple, Electric Green
  • Versafine: Onyx Black
  • Clear Embossing Powder
  • Sponge Dauber

Miscellaneous:

  • Impression Obsession: Dies: Square Shaker Frame DIE002-Z, Conversation Heart Block DIE133-C
  • Stamps: Conversation Hearts C5641
  • WR Memory Keepers: Corner Chomper
  • Cuttlebug: Embossing Folder
  • Satin ribbon
  • Pop Dots


Sign up for our newsletter
Facebook Pinterest Twitter YouTube Vimeo